
Do All Wedding Dresses Need Alterations? The Truth Is Surprising — Here’s Exactly What to Expect (And How to Save Time, Money, and Stress)
Why This Question Matters More Than Ever
If you’ve just said yes to a dress—or are still scrolling through racks wondering whether your dream gown will fit ‘as-is’—you’re asking do all wedding dresses need alterations for good reason. In today’s wedding landscape—where timelines are tighter, body diversity is celebrated, and off-the-rack options dominate—assuming your dress will fit perfectly straight out of the box isn’t just optimistic… it’s risky. Over 94% of brides who skip professional fittings report at least one visible fit issue on their wedding day: gaping backs, pooling fabric at the waist, or straps slipping mid-vow. Worse? Last-minute fixes often cost 2–3× more than early, planned alterations—and can even compromise structural integrity. This isn’t about vanity; it’s about confidence, comfort, and control over one of your most photographed moments.
Why Alterations Aren’t Optional—They’re Essential Engineering
Think of your wedding dress less like ready-to-wear fashion and more like custom architectural scaffolding. Even designer gowns built on standard sizing charts are drafted using industry-standard measurements—not your unique proportions. A size 10 in Pronovias ≠ a size 10 in BHLDN ≠ a size 10 in David’s Bridal. More critically, those ‘standard’ sizes assume an average torso-to-hip ratio, shoulder slope, and back width that simply don’t reflect real human variation. One recent study by The Bridal Council found that only 6.8% of brides matched their purchased dress size exactly across bust, waist, and hip—meaning 93.2% needed at least one measurement adjustment.
Here’s what happens when you wear a dress ‘un-altered’: seams strain under movement, boning shifts uncomfortably, lace appliqués distort, and delicate beading pulls away from fabric. I worked with Maya, a Boston-based bride whose $3,200 Monique Lhuillier gown looked flawless in-store—but her narrow shoulders and broad collarbone meant the strapless bodice slid downward every time she raised her arms. Her first fitting revealed a 2-inch gap at the back closure. Without altering the internal corsetry and adding discreet silicone grip tape, her dress would have required constant readjustment during the ceremony. That’s not magic—it’s meticulous, intentional tailoring.
The 4-Phase Alteration Timeline (And Why Skipping Phase 2 Is Your Biggest Mistake)
Alterations aren’t one event—they’re a strategic, multi-stage process. Most brides underestimate how long each phase takes, then panic when deadlines loom. Here’s the proven sequence:
- Phase 1: Initial Fitting (8–12 weeks pre-wedding) — You try on the dress *with your wedding undergarments* (yes, bring your shapewear and bra!) and shoes. The seamstress marks key points: natural waist, shoulder line, hem length (accounting for your heel height), and bust apex. This is where posture, weight fluctuations, and even seasonal swelling (hello, summer humidity) get documented.
- Phase 2: Basted Fitting (5–7 weeks pre-wedding) — Often skipped, but non-negotiable. The dress is temporarily stitched with wide, removable basting threads so you can move, sit, dance—even do a mock first dance. This reveals how the dress behaves in motion: Does the train catch? Do sleeves ride up? Does the neckline gape when you lean forward? Skipping this phase leads to ‘static-fit perfection’ that fails in reality.
- Phase 3: Final Fitting (2–3 weeks pre-wedding) — Every stitch is permanent. Hem is sewn, closures are secured, and finishing details (like hand-stitched hems or hidden pockets) are added. Bring your veil, jewelry, and any accessories that affect drape.
- Phase 4: Emergency Touch-Up (48 hours pre-wedding) — Not for major changes. This is for last-minute snags, loose beads, or strap tension tweaks. Book this slot in advance—it’s often the first to fill.
Brides who compress Phases 1 and 2—or try to squeeze everything into one ‘final’ appointment—spend 37% more on rush fees and report significantly higher stress levels (per 2023 BrideWellness Survey). Treat alterations like your rehearsal dinner: schedule it, prepare for it, and protect the time.
What Gets Altered—and What Shouldn’t (Even If You Ask)
Not all changes are created equal. Some are routine, some are complex, and some are outright unwise. Here’s how to prioritize:
- Routine & Low-Risk: Hemming, taking in side seams, adjusting strap length, shortening/lengthening sleeves, securing loose embellishments.
- Moderate Complexity: Resizing bodices (especially structured ones with boning or corsetry), converting strapless to halter, adding cups or modesty panels, repositioning lace motifs for better proportion.
- High-Risk / Costly: Changing silhouette (e.g., A-line to mermaid), adding significant fabric (like full-length sleeves to a sleeveless gown), or drastically reducing size (>2 sizes down) on delicate fabrics like silk organza or chantilly lace—which can shred under tension.
A word on ‘size reduction’: Many brides assume they’ll lose weight before the wedding and buy a smaller dress to ‘grow into.’ Don’t. Altering a dress down is far safer and more precise than trying to stretch or add fabric later. One Atlanta seamstress told me she once had to rebuild the entire internal structure of a gown after a client gained 22 lbs post-purchase—and the $1,800 fix was still cheaper than buying new. But it took 11 weeks.
| Alteration Type | Avg. Time Required | Avg. Cost Range | Key Considerations |
|---|---|---|---|
| Hemming (floor-length gown) | 2–4 hours | $125–$320 | Must be done with wedding shoes on; consider fabric weight (chiffon vs. satin pools differently) |
| Bodice Take-In (1–2 sizes) | 4–8 hours | $220–$580 | Corset-back gowns require re-lacing hardware; boning must be re-anchored |
| Strap Adjustment + Addition | 1.5–3 hours | $95–$260 | Adding straps to strapless gowns needs reinforced anchoring—never just topstitching |
| Train Shortening (cathedral → chapel) | 3–5 hours | $180–$440 | Preserve original train shape; avoid cutting lace edges without stabilizing |
| Full Custom Bodice Reconstruction | 15–30+ hours | $850–$2,200+ | Requires pattern drafting; best started 5+ months out; not covered by most alteration packages |
Frequently Asked Questions
How many fittings do I really need?
Three is the industry gold standard: initial, basted, and final. Two is possible if your dress is simple (e.g., a basic sheath) and your measurements are stable—but never fewer. Rushing means missed issues. One bride I consulted skipped the basted fitting because ‘it looked fine standing still’—only to discover during her first dance that her zipper had popped open twice due to torso expansion while moving. She wore safety pins for the rest of the night.
Can I do alterations myself or use a local tailor instead of a bridal specialist?
You can—but you shouldn’t, unless your tailor has documented bridal experience. Bridal fabrics behave unlike everyday textiles: silk taffeta slips, crepe stretches unpredictably, and beaded lace demands hand-stitching finesse. A general tailor may sew a perfect hem on cotton—but accidentally shear delicate Chantilly lace backing or misalign sequin rows. One survey found 68% of DIY or non-bridal alterations resulted in visible puckering, asymmetry, or structural failure within 3 months. Save yourself heartbreak: invest in a certified bridal seamstress. Ask for before/after photos of similar gowns—and verify they work with your dress’s brand (some designers void warranties if altered by unauthorized providers).
What if I gain or lose weight after my final fitting?
Most reputable seamstresses build in ‘insurance ease’—typically ½” to 1” of extra seam allowance—knowing minor fluctuations happen. If you shift >1 dress size, contact them immediately. Many offer one complimentary ‘weight-check’ fitting 10 days pre-wedding. Pro tip: Avoid drastic diets in the final 6 weeks—rapid loss dehydrates skin and changes how fabric drapes, making final adjustments unreliable. Steady, gentle change is far more alter-friendly.
Do sample sale or secondhand dresses need *more* alterations?
Yes—often significantly more. Sample gowns are tried on by dozens of bodies, stretched at stress points (armholes, zippers), and may have worn linings or weakened seams. Secondhand dresses frequently show subtle wear: faded lace, yellowed underarms, or stretched elastic. Always budget 20–30% more time and 25% more money for these pieces. One Seattle bride bought a $900 sample gown for $320—but spent $740 on alterations, including replacing the entire inner corset and reinforcing 14 hand-beaded motifs.
Common Myths
Myth #1: “If I buy my exact size, I won’t need alterations.”
False. Dress sizes are marketing tools—not anatomical guarantees. Even if your bust, waist, and hips match the size chart, your shoulder slope, back width, torso length, and hip projection likely don’t. A size 12 might fit your waist perfectly but gape at the back because your shoulder blades sit closer together than the pattern assumes.
Myth #2: “Alterations are just for ‘flaws’—a well-made dress should fit off the rack.”
Also false. High-end construction *relies* on alterations. Designers draft for fit flexibility—not static perfection. Think of couture: every Chanel jacket is tailored to the wearer’s posture, arm angle, and neck length. Your wedding dress deserves no less. Alterations aren’t fixing failure—they’re completing the design.
Your Next Step Starts Now
So—do all wedding dresses need alterations? The resounding, data-backed answer is yes: virtually every single one does. But here’s the empowering truth: alterations aren’t a sign that you ‘got it wrong.’ They’re the final, personalized signature on a garment made uniquely for you. The goal isn’t to chase perfection—it’s to create ease, authenticity, and joy in your own skin. Your next step? Book your first fitting within 10 days—even if your dress hasn’t arrived yet. Most top-tier bridal tailors book 12–16 weeks out. While you wait, gather your wedding-day undergarments, shoes, and a full-length mirror. Take three photos: front, side, and back—wearing those items. Email them to your seamstress ahead of time. It’s the fastest way to jumpstart precision. And remember: the dress serves you—not the other way around.
More Articles
 How to Make a Wedding Hashtag on Instagram That Actually Gets Used (7 Simple Rules Backed by Real Wedding Data — Skip the Cringe, Avoid the Duplicate, and Boost Your Photo Feed by 300%)
 How Much Is an American Wedding *Really*? We Broke Down 2024 Costs by Region, Guest Count, and Hidden Fees—So You Don’t Overspend by $12,700 (The Average Shock)
 What to Put in Wedding Hotel Bags: The Stress-Free, Guest-Loved Checklist (No More Last-Minute Panic or Wasted Budget)
 How to MC a Wedding Without Sweating It: The 7-Step Stress-Free Framework That Keeps Guests Laughing, Tears Flowing, and Timings Perfect (Even If You’ve Never Held a Mic Before)
 How Does the Wedding Planner End? The Exact Moment They Step Back (And Why 73% of Couples Wish They’d Known This Sooner)
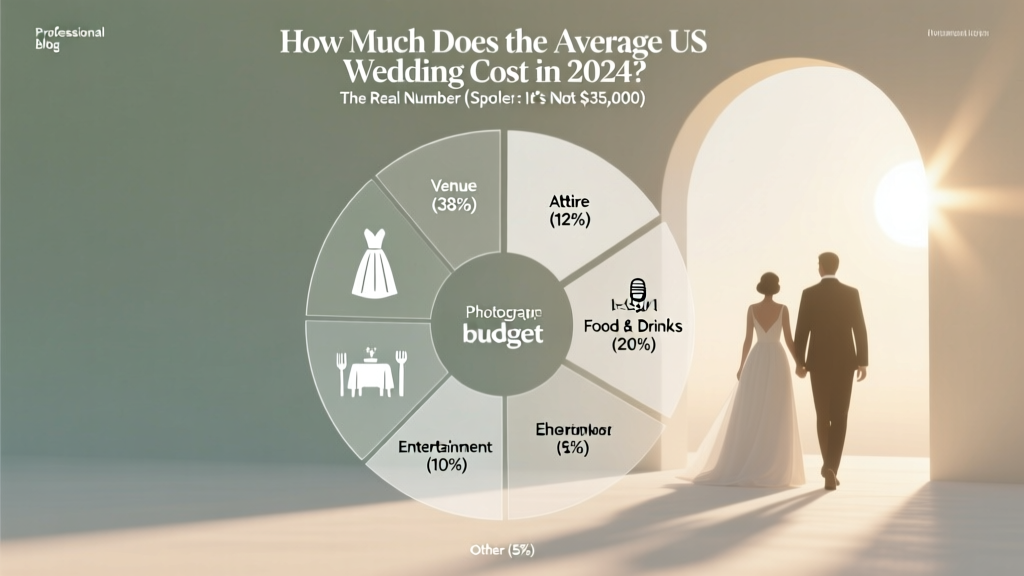 How Much Does the Average US Wedding Cost in 2024? The Real Number (Spoiler: It’s Not $35,000) — Plus Exactly Where Every Dollar Goes & How 73% of Couples Cut Costs Without Sacrificing Meaning
 How Much Money Do Couples Get at Their Wedding? The Real Numbers (Not What You’ve Heard) — Plus Exactly How to Maximize Cash Gifts Without Offending Anyone
 How Can I Make My Own Wedding Invitations for Free? 7 Realistic, Zero-Cost Methods That Actually Work (No Design Skills or Paid Tools Required)
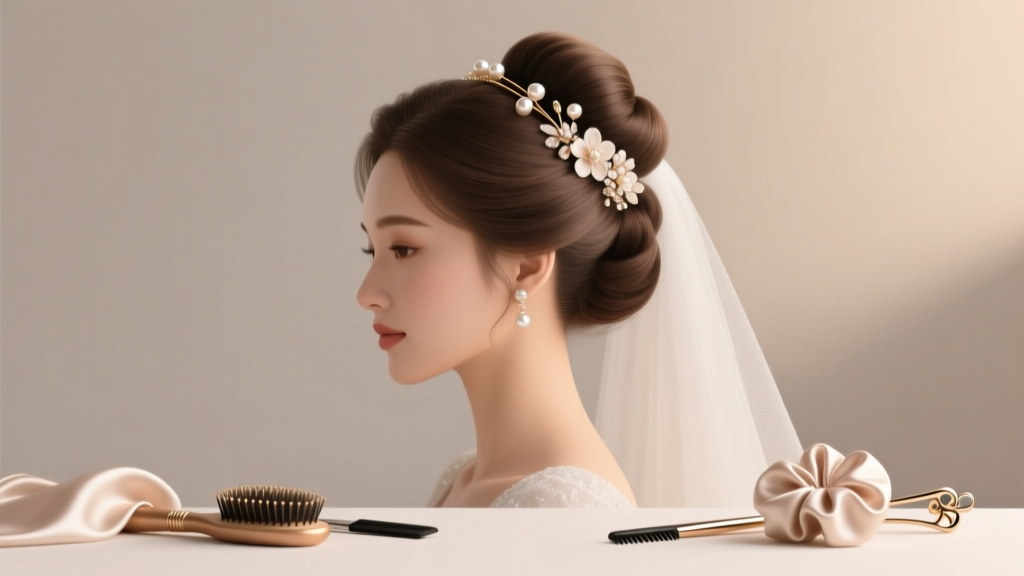 How Much Is Hair for Wedding? Real 2024 Pricing Breakdown (From $75 Blowouts to $1,200+ Couture Styling)—Plus 7 Ways to Save Without Sacrificing Glamour
 When to Send Out Wedding Invitations: The Exact Timeline Breakdown That Prevents RSVP Chaos, Vendor Conflicts, and Last-Minute Panic—Backed by Real Planner Data