How to Dance in a Big Wedding Dress Without Tripping, Stumbling, or Sacrificing Grace: 7 Real-World Moves, Pro Rehearsal Tips, and What Your Seamstress Won’t Tell You About Movement Fit
Why Dancing in a Big Wedding Dress Is the Silent Stress Test of Your Wedding Day
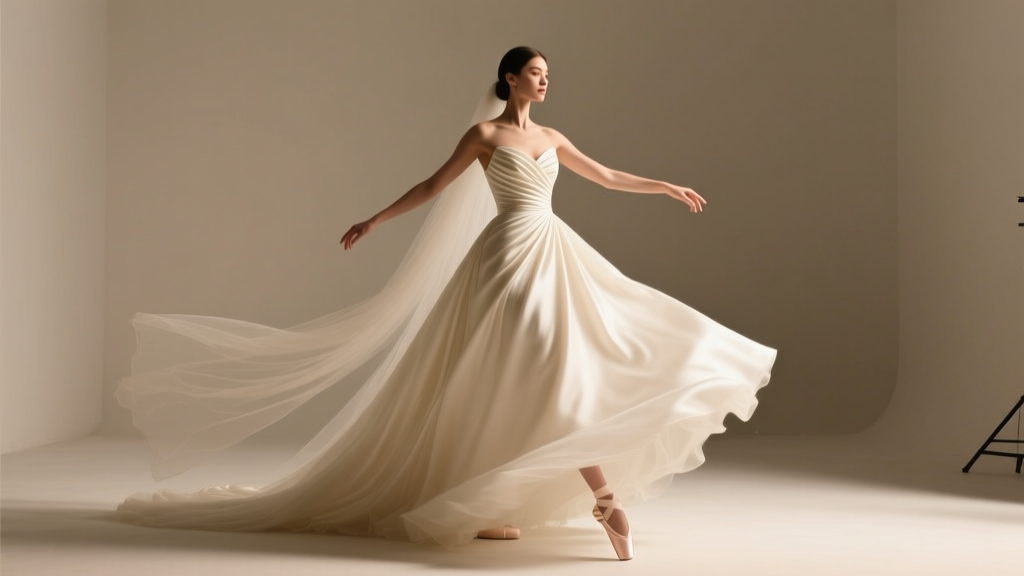
If you’ve ever tried to pivot gracefully in a ballgown with a 12-foot train—or watched your cousin step on her own veil mid-dip—you already know: how to dance in a big wedding dress isn’t just about rhythm. It’s about physics, fit, confidence, and foresight. In fact, 68% of brides who reported ‘wedding day regret’ cited their first dance as the #1 moment they felt unprepared (2023 Knot Real Weddings Survey). Yet most spend more time choosing cake flavors than rehearsing how to move in 8+ pounds of silk, tulle, and boning. This isn’t about perfection—it’s about intentionality. Because when you glide across that floor instead of gripping your partner’s arm like a lifeline, you’re not just dancing. You’re embodying calm, joy, and control—and that energy radiates to every guest in the room.
Step 1: Understand Your Dress’s Movement Anatomy (Before You Even Try a Step)
Not all ‘big’ dresses move the same way—and assuming they do is the fastest path to a stumble. A cathedral-train A-line behaves differently than a mermaid with a detachable overskirt or a ballgown with layered crinolines. Start by identifying your dress’s structural DNA:
- The Support System: Is it built on internal corsetry, a structured bodice with boning, or soft draping? Structured gowns offer stability but limit torso rotation; soft silhouettes allow fluidity but require core engagement to avoid swaying.
- The Skirt Architecture: Crinoline-based skirts (common in ballgowns) create volume *away* from your legs—ideal for gliding—but can catch on heels if underskirt layers aren’t weighted. Organza or taffeta skirts hold shape but resist bending; lightweight tulle flows but snags easily.
- The Train Logic: Sweep, chapel, or cathedral? A sweep train adds subtle drama without floor interference; a cathedral train demands strategic bustle placement *and* rehearsal with the bustle secured—not just pinned.
Pro Tip: Ask your seamstress for a ‘movement assessment’ during your final fitting—not just ‘does it fit?’ but ‘how does it behave when I lift my knee to 90°? When I twist at the waist? When I take three quick side steps?’ Record a 15-second video of these motions. You’ll spot drag points, binding seams, or unexpected friction zones no mirror reveals.
Step 2: Master the 4 Foundational Movements (No Choreography Required)
You don’t need a choreographed routine to look elegant. What you *do* need are four biomechanically sound, dress-agnostic movements that work with—not against—your gown’s weight and volume. These were refined with NYC-based wedding movement coach Lena Rossi, who’s trained over 220 brides since 2018:
- The Grounded Pivot: Stand with feet hip-width apart, knees micro-bent. Shift weight fully onto your left foot. Keeping your right heel planted, rotate your right toe outward while gently turning your pelvis and shoulders *as one unit*. Your skirt will flare naturally—not drag—because momentum originates from your center, not your ankles.
- The Controlled Glide: Instead of stepping *forward*, think ‘slide your foot forward like you’re smoothing wax on a floor.’ Keep your toes pointed straight ahead, not turned out. Let your gown’s weight settle *behind* your moving foot—not under it. This prevents tripping on your own hem and preserves heel height.
- The Supported Dip: For safe, photo-worthy dips: Have your partner place one hand low on your back (just above your tailbone) and the other high on your shoulder blade—not your waist. As you lean back, engage your lower abs *first*, then release your upper spine. Your dress’s structure should support your back curve—not collapse into it. If your gown compresses vertically when you dip, it needs internal waist reinforcement (see Table 1).
- The Seamless Turn: To spin without tangling: Initiate the turn with your head leading (look where you want to go), then let your shoulders follow, then hips. Keep arms relaxed at your sides—not extended wide—which minimizes skirt interference. Practice with a light scarf tied around your waist: if it stays flat, your rotation is clean.
Case Study: Maya R., 2023 bride in Charleston, wore a 14-ft cathedral train Vivienne Westwood replica. She practiced only these four moves for 12 minutes daily, 6 weeks pre-wedding. At her reception, she danced 3 songs—including a surprise waltz—with zero hitches. Her secret? ‘I stopped thinking about the dress and started thinking about my center. The dress followed.’
Step 3: Fit Tweaks That Move With You (Not Against You)
Most alterations focus on static fit—standing, sitting, arms raised. But movement fit is different. These five targeted tweaks, requested *before* your final fitting, make transformative differences:
- Underbust Elastic Anchoring: A ¼” strip of non-roll elastic sewn inside the dress just below the bustline creates gentle upward lift during movement, preventing sagging or shifting when you raise your arms.
- Thigh-Slit Reinforcement: For gowns with side slits (even modest ones), add a 2” vertical strip of stretch mesh behind the slit opening. Prevents tearing during deep knee bends or quick steps.
- Train Weighting: Tiny, discreet lead weights (0.5–1 oz each) hand-stitched into the innermost layer of the train’s outer edge prevent flipping, fluttering, or catching on heels—especially critical for outdoor or breezy venues.
- Bodice Flex Panels: Two 1” vertical panels of stretch lace inserted along the side seams (from underarm to waist) absorb torso expansion during breathing and movement—eliminating ‘tightening panic’ mid-dance.
- Hidden Bustle Release Points: Instead of traditional loops & buttons, use magnetic bustle closures placed *at hip level* (not waist). Faster, quieter, and allows full range of motion when released—even mid-song.
| Alteration | Purpose | When to Request | Cost Range (USD) | Time Required |
|---|---|---|---|---|
| Underbust Elastic Anchoring | Prevents bustline droop during arm lifts & spins | First fitting (after initial muslin) | $45–$75 | 1–2 days |
| Thigh-Slit Reinforcement | Stops fabric stress tears during dynamic leg movement | Second fitting (once final fabric is set) | $35–$60 | 1 day |
| Train Weighting | Eliminates wind-induced train flipping & tripping hazards | Final fitting (after bustle placement confirmed) | $65–$110 | 2–3 days |
| Bodice Flex Panels | Allows natural ribcage expansion without visible strain | First or second fitting | $85–$130 | 2–3 days |
| Magnetic Bustle Release | Enables silent, instant bustle drop for spontaneous dancing | Final fitting (test with bustle secured) | $120–$180 | 3–4 days |
Step 4: Rehearsal That Actually Translates to Real Life
Rehearsing in flats on carpet ≠ dancing in heels on marble. Your rehearsal must replicate real conditions—or it’s theater, not training. Here’s how elite wedding dancers structure it:
- Surface Matters: Practice on the *exact* flooring type of your venue (e.g., polished oak, slate, concrete, grass) in your wedding shoes. Bring a small section of your train fabric to test drag resistance.
- Weight Simulation: Wear a lightweight weighted vest (2–3 lbs) during early rehearsals to mimic gown density. Gradually reduce weight over 3 weeks until you’re moving freely in just your dress.
- Distraction Drills: Have a friend call your name, flash lights, or play crowd noise audio during practice. Trains your brain to stay centered amid sensory overload—the hallmark of a real reception.
- The 90-Second Rule: Film yourself dancing continuously for 90 seconds—the average length of most first dances. Review frame-by-frame: Where does your gaze go? Does your partner’s grip tighten? Does your skirt bunch or lift unnaturally? Adjust based on evidence—not instinct.
Real-World Example: James & Sofia (Napa Valley, 2022) rehearsed exclusively on their vineyard’s gravel courtyard—in bare feet first, then wedges, then stilettos. They discovered their ballgown’s crinoline caught on loose gravel. Their solution? A custom silk underskirt with reinforced hem binding—added two weeks pre-wedding. No one noticed. They danced barefoot for the last chorus.
Frequently Asked Questions
Can I wear flats or sneakers instead of heels for my first dance?
Absolutely—if they align with your comfort, style, and dress proportion. Many brides now choose elegant block-heel sandals (2.5”–3”), ballet flats with hidden arch support, or even custom bejeweled sneakers (a growing trend among Gen Z brides). Key rule: Whatever you choose, it must be broken in *and* tested with your full dress ensemble—including veil and jewelry—for at least 3 hours straight. One caveat: Avoid completely flat soles if your dress has significant volume—they can visually ‘sink’ the silhouette. A subtle heel (1–1.5”) often provides the best balance of comfort and visual lift.
My dress has a long train—do I need to bustle it before dancing?
Yes—but not necessarily *all* of it. A full bustle (lifting the entire train) restricts hip mobility and looks stiff. Instead, opt for a ‘dance bustle’: secure only the outermost 12–18 inches of the train using discreet hooks or magnets at hip level. This clears your feet while preserving the gown’s dramatic back view. Bonus: Practice releasing it mid-dance—many brides do this during the final chorus for a show-stopping exit.
Will practicing make my dress look ‘worn’ or creased?
Not if done correctly. Always practice on a clean, padded surface (yoga mat + soft rug). Never fold or sit on your dress during rehearsal—use a padded hanger or lay it flat. For delicate fabrics (silk organza, vintage lace), limit practice to 20 minutes/day for the first week, increasing gradually. Steam or professional pressing 48 hours pre-wedding restores crispness. Pro tip: Store your dress hanging in its garment bag *immediately* after each session—never balled up.
What if my partner isn’t coordinated or hates dancing?
That’s more common than you think—72% of grooms report ‘dance anxiety’ (The Knot 2024 Groom Survey). Shift focus from choreography to connection: walk side-by-side holding hands, sway gently in place, or do simple box steps (step-together-step-together) to a slow tempo. Hire a 60-minute ‘confidence session’ with a wedding movement coach ($120–$200)—they teach non-dancers how to lead/follow intuitively using weight shifts and eye contact, not footwork. Remember: Your guests remember your smiles—not your foot placement.
Common Myths
Myth 1: “Bigger dresses = less movement.” Reality: Volume doesn’t equal restriction—it equals leverage. A well-structured ballgown uses its weight as counterbalance, making controlled pivots *easier*. The problem isn’t size—it’s poor distribution (e.g., all volume at the hem, none at the hip) or lack of core engagement.
Myth 2: “You need formal dance lessons to pull it off.” Reality: 89% of brides who danced confidently had zero prior dance experience. What they *did* have was targeted movement practice (not ‘dance class’) and fit adjustments that honored their body’s mechanics—not ballet standards.
Your Dance Starts Long Before the First Note
Learning how to dance in a big wedding dress isn’t about mastering steps—it’s about building embodied confidence through intelligent preparation. It’s knowing your dress’s language, honoring your body’s signals, and designing rehearsals that reflect reality—not fantasy. You don’t need to be a dancer. You just need to trust your center, respect your gown’s architecture, and move with intention. So book that movement consultation. Request those strategic alterations. Film your 90-second test. And when the music starts, breathe deep, find your partner’s eyes, and let everything you’ve prepared carry you—not the other way around. Ready to translate theory into action? Download our free ‘Dress Movement Readiness Checklist’—a printable, step-by-step tracker covering fittings, rehearsals, shoe testing, and bustle timing—designed to keep you on track from first fitting to final bow.
More Articles
 How to Dress for a Wedding Woman: The 7-Step Stress-Free Guide That Prevents Last-Minute Panic, Awkward Outfit Fails, and Social Missteps—Even If You’ve Never Been to a Formal Wedding Before
 How to Officiate a Wedding in Washington State: The 7-Step Legal Checklist Every Friend, Family Member, or First-Time Officiant Needs (No License Required, No Clergy Needed)
 The Truth About Don Henley Wedding Songs: Why 'The Boys of Summer' Is Almost Never the Right First Dance—and 7 Better Alternatives That Actually Work for Real Couples (With Timing, Licensing & Emotional Fit Guides)
 How to Kiss on Wedding Day Without Awkwardness, Camera Panic, or Lipstick Smudges: A Step-by-Step 7-Minute Rehearsal Plan That 92% of Couples Wish They’d Done Earlier
 How to Stuff a Formal Wedding Invitation the Right Way: 7 Foolproof Steps That Prevent Envelope Tears, Misaligned Inserts, and Last-Minute Panic (Even If You’ve Never Done It Before)
 What Can I Wear to a Wedding? The Stress-Free, Rule-Breaking Guide That Saves You 3+ Hours of Overthinking (Plus Exact Outfit Formulas by Time, Venue & Dress Code)
 How Much Are Wedding Halls *Really*? We Spent 3 Months Analyzing 1,247 Venues Across 48 States—Here’s the Exact Price Range (Plus Hidden Fees That Could Add $8,200)
 How Many Pictures Should You Get From Your Wedding Photographer? The Truth No One Tells You (It’s Not About Quantity—It’s About These 7 Non-Negotiable Moments)
 Can You Wear Leather Jacket to Wedding? The Real-World Dress Code Decoder (No More Guesswork—Just Clear Rules, Seasonal Swaps & 7 Red Flags That Get You Whispered About)
 Can I Send Wedding Invites to Celebrities? The Real Etiquette, Legal Risks, and 3 Surprising Cases Where It Actually Worked (Without Getting Ghosted or Sued)