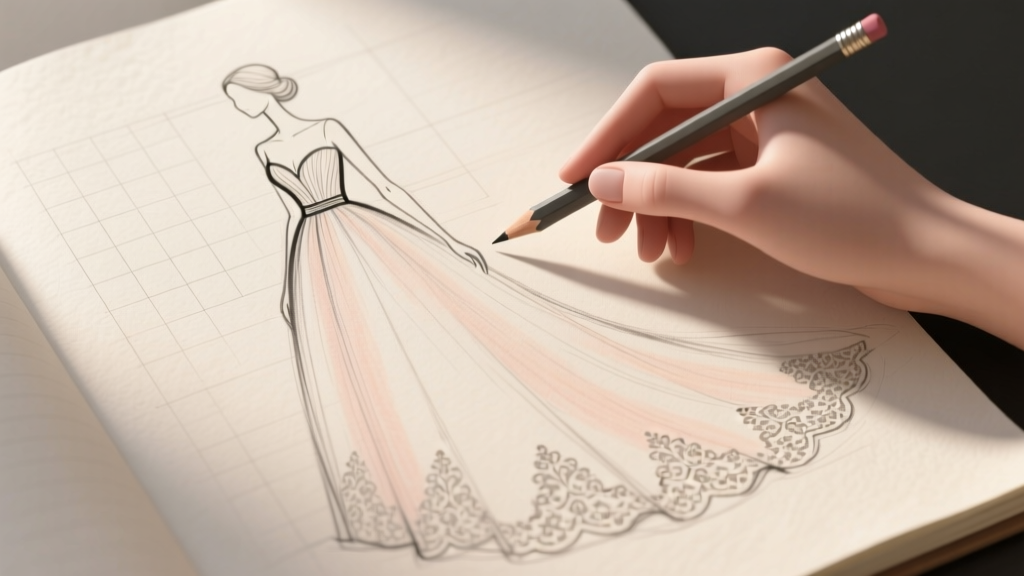
How to Draw a Wedding Gown: Step-by-Step Guide for Beginners and Fashion Designers
# How to Draw a Wedding Gown: Step-by-Step Guide for Beginners and Fashion Designers
Dreaming of designing your own wedding gown but don't know where to start? Whether you're a bride with a vision, an aspiring fashion designer, or simply a creative soul, learning to draw a wedding gown is more achievable than you think. With the right techniques and a little practice, you can sketch breathtaking bridal designs from scratch.
---
## 1. Gather Your Tools and Set Up Your Fashion Croquis
Before you draw a single line, having the right tools makes all the difference.
**Essential supplies:**
- Pencils (HB for sketching, 2B for shading)
- Fine-tip black ink pen or marker
- Eraser and blending stump
- Smooth sketch paper or fashion design paper
- Colored pencils or watercolors (optional, for rendering)
Start with a **fashion croquis** — a stylized figure template used by professional designers. Unlike a realistic human body, a croquis is elongated (typically 9–10 heads tall) to make garments look more elegant. You can find free printable croquis templates online or sketch your own.
**Pro tip:** Lightly sketch the croquis in pencil first. The figure is your foundation — the gown comes second.
---
## 2. Sketch the Silhouette: Choose Your Gown Style
The silhouette is the most defining element of any wedding gown. Before adding details, decide which style you're drawing:
| Silhouette | Description | Best For |
|---|---|---|
| **A-Line** | Fitted bodice, flares from waist | Most body types |
| **Ball Gown** | Full, voluminous skirt | Classic princess look |
| **Mermaid/Trumpet** | Fitted through hips, flares at knee | Hourglass figures |
| **Sheath/Column** | Straight, form-fitting | Minimalist brides |
| **Empire Waist** | High waistline, flowing skirt | Romantic, vintage styles |
**How to draw the silhouette:**
1. Lightly outline the bodice following the croquis torso.
2. Draw the skirt shape extending from the waist or hips depending on your chosen style.
3. Indicate the hemline — floor-length, tea-length, or with a train.
4. Add a train if desired: a **cathedral train** extends 6–8 feet; a **sweep train** just grazes the floor.
Keep lines loose and gestural at this stage. You're building shape, not detail.
---
## 3. Add Structural Details: Bodice, Neckline, and Sleeves
Once your silhouette is in place, it's time to bring the gown to life with design details.
### Neckline Options
- **Sweetheart:** Curved, heart-shaped top — the most popular bridal neckline
- **V-neck:** Elongates the neck and décolletage
- **Bateau/Boat neck:** Horizontal line across the collarbone, elegant and modest
- **Off-the-shoulder:** Romantic and timeless
- **Illusion neckline:** Sheer fabric with lace appliqués, very modern
### Bodice Construction
Draw boning lines (vertical seam lines) on the bodice to suggest structure. Add a center front seam and princess seams curving from the bust to the waist for a fitted look.
### Sleeves
- **Cap sleeves:** Small, delicate — just a hint of coverage
- **Long sleeves:** Sketch fitted or slightly flared; add lace texture with small curved lines
- **Puff sleeves:** Draw a rounded, voluminous shape at the shoulder
- **Sleeveless:** Simply clean up the armhole edge
**Tip for lace:** Suggest lace with small floral or geometric patterns rather than drawing every detail. A few well-placed motifs read as lace to the eye.
---
## 4. Render Fabric, Texture, and Embellishments
This is where your sketch transforms from a flat drawing into a luxurious bridal design.
### Fabric Rendering Techniques
- **Satin:** Use smooth, confident strokes with sharp highlights. Leave white areas where light hits the fabric.
- **Tulle/Organza:** Use light, feathery lines to suggest volume and transparency. Layer multiple soft lines.
- **Lace:** Draw a base fabric, then overlay floral or geometric motifs. Use a fine pen for detail work.
- **Chiffon:** Flowing, soft folds drawn with gentle curved lines.
### Adding Embellishments
- **Beading:** Small dots or dashes clustered along the bodice or hem
- **Embroidery:** Delicate floral or vine patterns drawn with a fine-tip pen
- **Buttons:** A row of small circles down the back closure adds realism
- **Belt or sash:** A horizontal band at the waist, sometimes with a bow
### Shading for Dimension
Shade the inner folds of the skirt and under the bust to create depth. Use a blending stump or your finger to soften pencil shading. The light source is typically from the upper left — keep the right side and lower folds darker.
---
## Common Mistakes (And How to Fix Them)
### Myth #1: "You Need to Be a Trained Artist to Draw Fashion"
**The truth:** Fashion illustration uses stylized, simplified forms — not photorealistic drawing. The elongated croquis and gestural lines are *intentional*. Many professional fashion designers are self-taught sketchers. Focus on proportion and silhouette over perfect anatomy. Practice with tracing paper over croquis templates until the proportions feel natural.
### Myth #2: "More Detail Always Means a Better Sketch"
**The truth:** Over-detailing is one of the most common mistakes beginners make. A cluttered sketch loses its elegance. Professional fashion illustrators suggest fabric texture and embellishment rather than drawing every bead or lace thread. Use the "suggestion principle" — a few well-placed details let the viewer's eye fill in the rest. A clean, confident silhouette with selective detail is far more striking than a busy, overworked drawing.
---
## Conclusion: Start Sketching Your Dream Gown Today
Drawing a wedding gown is a skill that combines artistic technique with fashion knowledge — and it's absolutely learnable. Start with a solid croquis, choose a silhouette that excites you, build up your details layer by layer, and don't be afraid to make mistakes. Every sketch you complete makes the next one better.
Whether you're designing your own wedding dress, building a bridal fashion portfolio, or simply exploring a creative hobby, the most important step is picking up that pencil and starting.
**Ready to go further?** Try sketching one gown in each of the five major silhouettes this week. Share your designs with a bridal fashion community online — you might be surprised by the feedback and inspiration you receive. Your dream gown design is just a sketch away. How to Decorate a Pavilion for a Wedding: 7 Stress-Free Steps That Cut Setup Time by 40% (Without Sacrificing Elegance or Budget)
 How Much to Put in Wedding Card? The Real Answer (No Awkward Guessing, No Offense Taken): A Stress-Free Guide Based on Your Relationship, Budget, & Local Norms — With Exact Dollar Ranges for 2024
 Where to Get Suit for Wedding: 7 Real-World Options (2024 Tested) — From $199 Off-the-Rack to $3,200 Bespoke, With Rent vs. Buy ROI Calculations & Timeline-Safe Deadlines
 What Percentage of Wedding Guests Decline? The Real Numbers (Not the Myths) — Plus How to Predict Your No-Shows So You Don’t Overbook Catering or Waste $2,800 on Empty Chairs
 What No One Tells You About Booking Aren Leekong Wedding Services: A Realistic 2024 Planning Timeline, Pricing Breakdown, and 7 Must-Ask Questions Before You Sign (Especially If You’re Booking 6–12 Months Out)
 Who Buys Used Wedding Dresses Near Me? 7 Verified Local & Online Buyers (Plus How to Get 60–85% of Retail Value—Without Scams or Hassle)
 Stop Overthinking It: 7 Realistic, Flattering, & Weather-Ready A-Line Fall Wedding Guest Dresses You Can Buy *This Week* (No Last-Minute Panic, No Fashion Regrets)
 How Many Gifts on Wedding Registry? The Realistic, Stress-Free Formula (Not Guesswork) That Prevents Over-Registry, Under-Gifting, and Awkward Thank-You Notes
 How to Fix Wedding Invitation Mistakes: 7 Real-World Fixes (That Save Your Budget, Timeline & Sanity—Even After Printing)
 Do You Put Real Flowers on Wedding Cake? The Truth About Safety, Cost, and Stunning Results (Plus 5 Florist-Approved Alternatives You Haven’t Considered)