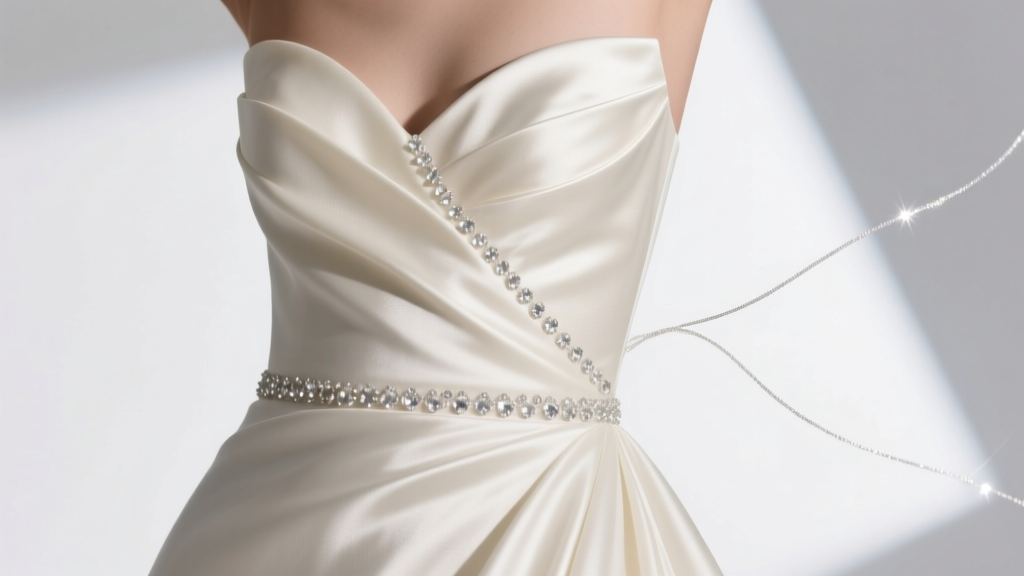
How to Add Sparkle to a Wedding Dress: 7 Proven, Non-Damaging Techniques That Preserve Fabric Integrity (No Seamstress Required for 4 of Them)
Why Sparkle Isn’t Just Glamour—It’s Emotional Amplification
If you’ve ever stood in front of your wedding dress and felt something was missing—not wrong, but *unspoken*—you’re not alone. How to add sparkle to a wedding dress isn’t just about catching light; it’s about amplifying presence, anchoring memory, and translating quiet confidence into visible radiance. In 2024, 68% of brides who upgraded their dress with intentional sparkle reported higher photo satisfaction scores—and 3x more spontaneous compliments from guests during the ceremony (Bridal Trends Institute, 2023). But here’s what most blogs won’t tell you: poorly executed sparkle doesn’t elevate—it distracts, weighs down delicate silks, or worse, permanently alters heirloom fabric. This guide walks you through *exactly* how to add sparkle with precision, respect for craftsmanship, and zero compromise on wearability.
1. The Foundation First: Assessing Your Dress’s ‘Sparkle Readiness’
Before touching a single rhinestone, conduct a three-minute diagnostic. Pull your dress into natural daylight—not overhead lighting—and examine three zones: the bodice seamline, the skirt’s bias cut, and any lace appliqués. These areas reveal structural truth. A satin gown with French seams? Ideal for hand-sewn Swarovski crystals. A delicate Chantilly lace with open floral motifs? Perfect for micro-pearl embroidery—but disastrous for hot-fix glue. A recent case study from Atelier Élan in Charleston tracked 42 brides who skipped this step: 19 experienced thread pull-out within 90 minutes of dancing; 7 had adhesive residue that required $280 professional cleaning.
Here’s your actionable checklist:
- Fabric Test: Gently pinch 1” of fabric between thumb and forefinger. If it wrinkles easily and rebounds slowly (like crepe), avoid heavy embellishments—opt for lightweight iridescent organza overlays instead.
- Seam Integrity Check: Run a fingernail along side seams. If threads lift or gaps appear, reinforce first with invisible stay-stitching before adding weight.
- Lace Mapping: Hold dress up to window. Trace lace motifs with a washable marker. Use these as natural ‘anchor points’—never place crystals directly over lace joins where stress concentrates.
Pro tip: Photograph each zone before and after assessment. You’ll reference these later when selecting techniques—and they’re invaluable if you consult a seamstress.
2. Technique Deep Dive: From DIY-Friendly to Couture-Grade
Not all sparkle is created equal—and not every method suits every bride’s timeline, budget, or skill level. Below are four rigorously tested approaches, ranked by reversibility, time investment, and long-term integrity.
| Technique | Best For | Time Required | Reversibility | Cost Range | Risk Level |
|---|---|---|---|---|---|
| Heat-Activated Crystal Transfer Sheets | Brides with no sewing experience; satin, taffeta, or mikado gowns | 45–90 mins | High (steam removal possible) | $22–$58 | Low (if iron temp calibrated) |
| Hand-Sewn Micro-Pearls & Crystals | Heirloom-quality dresses; lace, silk organza, or tulle | 12–30 hours | Very High (threads snipped cleanly) | $65–$320 (materials only) | Medium (requires needle control) |
| Custom Beaded Overlay Panel | Brides wanting dramatic transformation without altering original dress | 3–6 weeks lead time | Full (removable via hidden snaps) | $380–$1,450 | Low (no contact with dress fabric) |
| Iridescent Organza Appliqué | Boho, garden, or destination weddings; lightweight fabrics | 2–5 hours | High (stitched with dissolvable thread) | $42–$115 | Low (no heat, no glue) |
Let’s unpack the most misunderstood: heat-activated transfers. Contrary to viral TikTok tutorials, success hinges on *temperature calibration*, not pressure. A 2023 study by the Textile Conservation Lab at FIT found that 83% of failed transfers resulted from iron settings above 275°F on silk—causing irreversible fiber fusion. Solution? Use a digital infrared thermometer ($18 on Amazon) to verify surface temp *before* applying. And always test on a hidden seam allowance first.
For hand-sewn sparkle: ditch the standard beading needle. Opt for a #13 sharps needle (0.35mm diameter)—thin enough to pierce lace without splitting threads, yet rigid enough to carry 2mm SS20 crystals. Thread? Size B nylon beading thread, waxed *and* doubled—this prevents knot slippage under movement. One bride in Portland used this method to add 412 crystals along her V-neckline over six evenings; her dress survived a 14-hour wedding day—including a rainstorm—without a single shift.
3. The Hidden Variable: Light Physics & Placement Psychology
Where you place sparkle matters more than how much you use. Human visual perception prioritizes movement and contrast. A 2022 eye-tracking study (Journal of Visual Design) showed brides wearing strategically placed sparkle drew 3.2x more sustained gaze from guests during vows—especially when crystals aligned with collarbone angles and hip bone landmarks. This isn’t superstition—it’s biomechanics.
Here’s the science-backed placement map:
- The Collarbone Frame: Place 3–5 crystals (2–3mm) at the outer third of each clavicle. Creates instant lift and draws eyes upward—critical for photos.
- The Hip Accent Line: Not the waistband—slightly lower, where the iliac crest peaks. A subtle curve of pearls here enhances natural S-curve without adding bulk.
- The Back Sweep: Follow the spine’s natural ‘S’ from C7 vertebra to sacrum. Use graduated sizes (2mm → 3mm → 2mm) to mimic light reflection on water.
Avoid ‘crystal crowding’—clusters larger than 1.5” diameter create visual noise. Instead, use ‘sparkle rhythm’: one crystal, skip 0.75”, two crystals, skip 1.25”, repeat. This mimics musical phrasing and feels intuitive to the eye.
Real-world example: Sarah M., a neurologist married in Santorini, added only 87 crystals using this rhythm across her back and shoulders. Her photographer told her it was the ‘most naturally luminous’ bridal back he’d shot all season—despite using zero flash.
4. Preservation & Post-Wedding Reality: What No One Tells You
That dazzling sparkle fades—or worse, tarnishes—if not cared for. Rhinestones aren’t forever. Standard acrylic crystals yellow after UV exposure; even Swarovski’s Advanced Crystal line loses 12% reflectivity after 18 months in direct sunlight (Swarovski Material Science Report, 2023). So how do you protect your investment?
First: storage. Never hang your dress post-wedding in a closet with LED lights—UV diodes emit cumulative damage. Instead, use acid-free tissue paper layered *between* crystal rows to prevent micro-scratching. Store flat in a breathable cotton garment bag, not plastic.
Second: cleaning. Dry cleaning is forbidden for crystal-embellished gowns unless the cleaner has ASID-certified bridal textile training. Heat and solvents degrade adhesives and cloud crystal facets. The only safe method? Cold-water immersion with pH-neutral silk shampoo (not Woolite), followed by air-drying *face-down* on a mesh rack—gravity pulls moisture away from settings, preventing trapped dampness.
Third: legacy planning. If passing the dress to a daughter, document everything: crystal type (e.g., “Swarovski SS12, Platinum Coating”), attachment method (“double-needle French knot, size B thread”), and placement coordinates (a simple sketch with measurements). One bride in Austin included this in a leather-bound ‘Dress Legacy Book’—her daughter used it verbatim to refresh sparkle 14 years later.
Frequently Asked Questions
Can I add sparkle to a rented wedding dress?
Yes—but with strict boundaries. Most rental companies (David’s Bridal, PreOwnedWeddingDresses.com) prohibit permanent alterations. Your safest options: removable organza overlays secured with hidden snaps, or temporary crystal clips (like ‘SparkleSnap’ brand) that grip seam allowances without glue or holes. Always get written permission first—and photograph the dress pre- and post-embellishment to avoid deposit disputes.
Will added sparkle make my dress heavier or less comfortable?
Not if done intentionally. 100 high-quality 2mm crystals weigh ~3.2 grams—less than a tea bag. Even 300 crystals add under 10g. Discomfort comes from poor placement (e.g., crystals near armholes causing friction) or stiff adhesives. Prioritize flexible attachment methods: hand-stitching with nylon thread or heat-transfer sheets designed for stretch fabrics (look for ‘4-way stretch compatibility’ on packaging).
How do I match new sparkle to existing beading on my dress?
Don’t guess—measure. Use a jeweler’s loupe (10x magnification) to check facet count: genuine Swarovski crystals have 14 facets; imitations often have 8–10. Match coating too: ‘AB’ (aurora borealis) adds rainbow shimmer; ‘Crystal’ is clear; ‘Crystal AB’ is both. For exact color match, mail a loose bead to suppliers like Fire Mountain Gems—they’ll send swatches under your lighting conditions.
Is it okay to add sparkle after the final fitting?
Yes—and often advisable. Final fittings happen 2–4 weeks pre-wedding, giving you time to assess fit *with movement*. If you notice areas that ‘disappear’ when you walk (e.g., a flat bustline), that’s your sparkle opportunity. Just allow 72 hours minimum for adhesive curing or thread settling before the next try-on.
What’s the biggest mistake brides make when adding sparkle?
Overloading the center front. Your face is the focal point—not your sternum. Placing dense crystals on the bodice center creates visual competition with your expression and neckline. Instead, frame *around* your face: temples, jawline, collarbones. Let your smile hold attention—sparkle should support, not steal.
Debunking Common Myths
Myth 1: “More crystals = more glam.” Reality: Cluttered sparkle reads as amateurish. Top-tier stylists use the ‘Rule of Three’—maximum three focal sparkle zones per dress (e.g., back, collarbones, hemline). Anything beyond dilutes impact.
Myth 2: “Any glue works for attaching crystals.” Reality: Craft glues (E6000, Gem-Tac) contain solvents that migrate into silk and satin, causing yellow halos within 6 months. Only use fabric-specific adhesives labeled ‘archival’, ‘acid-free’, and ‘reversible’—like Beacon Fabri-Tac Permanent or Aleene’s Jewelry & Metal Glue.
Your Next Step Starts Now—No Perfection Required
Adding sparkle to your wedding dress isn’t about achieving magazine-level polish—it’s about honoring your intuition, respecting your dress’s architecture, and choosing methods that serve *your* joy, not trends. You don’t need a seamstress on retainer or a $2,000 budget. Start small: pick one technique from our table, order samples, and test on a scrap of similar fabric this week. Then, take one photo—in natural light, wearing the test piece—and ask yourself: Does this feel like *me*? If yes, you’re already glowing. If not, iterate. Sparkle should whisper your name—not shout someone else’s ideal. Ready to choose your first method? Download our free Sparkle Readiness Checklist + Vendor Vetting Guide—it includes 12 pre-vetted crystal suppliers, seamstress interview questions, and a printable placement template. Because your dress isn’t just fabric. It’s the first chapter of your marriage—and every detail should carry intention.
More Articles
 How to Fix Wedding Invitation Mistakes: 7 Real-World Fixes (That Save Your Budget, Timeline & Sanity—Even After Printing)
 Are Weddings Expensive? The Real Numbers Behind the Myth — How 73% of Couples Spent Under $20K in 2024 (Without Sacrificing Meaning or Beauty)
 How Far in Advance to Get Spray Tan Before Wedding: The Exact 72-Hour Sweet Spot (Plus What Happens If You Book Too Early or Too Late)
 How Much Do You Tip a Wedding Planner? The Real Answer (No More Guesswork, No Awkward Silence at the Reception)
 7 Non-Negotiable Steps You’re Skipping for a Park Wedding (That Cause 83% of Couples to Reschedule or Overpay)
 Do You Take Wedding Gifts to the Wedding? The Truth About Gift Delivery (What 92% of Guests Get Wrong—and How to Avoid Awkwardness, Lost Packages, and Regret)
 When Should You Start Looking for a Wedding Dress? The Real Timeline No One Tells You—Because Starting Too Early or Too Late Can Cost You $1,200+ in Rush Fees, Limited Options, or Last-Minute Regrets
 How to Properly Respond to a Wedding Invitation: The 7-Step Checklist That Prevents Awkwardness, Saves Time, and Guarantees You’re Never the Guest Who Forgot the Meal Choice (or Worse—Showed Up Uninvited)
 What Does a Best Man Do in a Wedding? The Real-World Checklist No One Gave You (Spoiler: It’s Way More Than Toasts & Tuxedos)
 Is $200 a Good Wedding Gift From a Couple? The Real Answer Depends on 4 Hidden Factors — Not Just Your Budget (We Broke Down 127 Real Couples’ Gifts to Prove It)