How to Dress Up a Wedding Dress: 7 Proven, Non-Damaging Ways to Elevate Your Gown (Without Altering the Original Seamline or Voiding Your Designer Warranty)
Why "Dressing Up" Your Wedding Dress Is Smarter Than You Think—And Why Most Brides Wait Until It’s Too Late
If you’ve already found the dress—but it feels just shy of magical on your wedding day—then you’re not alone. In fact, 68% of brides surveyed by The Knot in 2023 admitted they wished they’d invested more time and creativity into how to dress up a wedding dress after purchase, not before. This isn’t about fixing a ‘wrong’ choice—it’s about unlocking hidden dimension, personal resonance, and photographic impact in a garment that already fits your body and budget. Unlike costly redesigns or risky DIY hacks, smart dressing-up is reversible, preservation-safe, and deeply intentional. And here’s the truth no bridal consultant will tell you upfront: your dress wasn’t designed to be worn *as-is*. It was designed to be *curated*—with your personality, venue, season, and emotional narrative in mind.
Think of your gown as a canvas—not a final painting. The lace may whisper elegance, but only when paired with the right cathedral veil does it roar. The satin may gleam under candlelight, but only with a vintage brooch at the waist does it tell your grandmother’s story. This article gives you the exact toolkit, timeline, and vendor vetting criteria used by top-tier bridal stylists—and crucially, what to avoid if you want your dress preserved intact for generations.
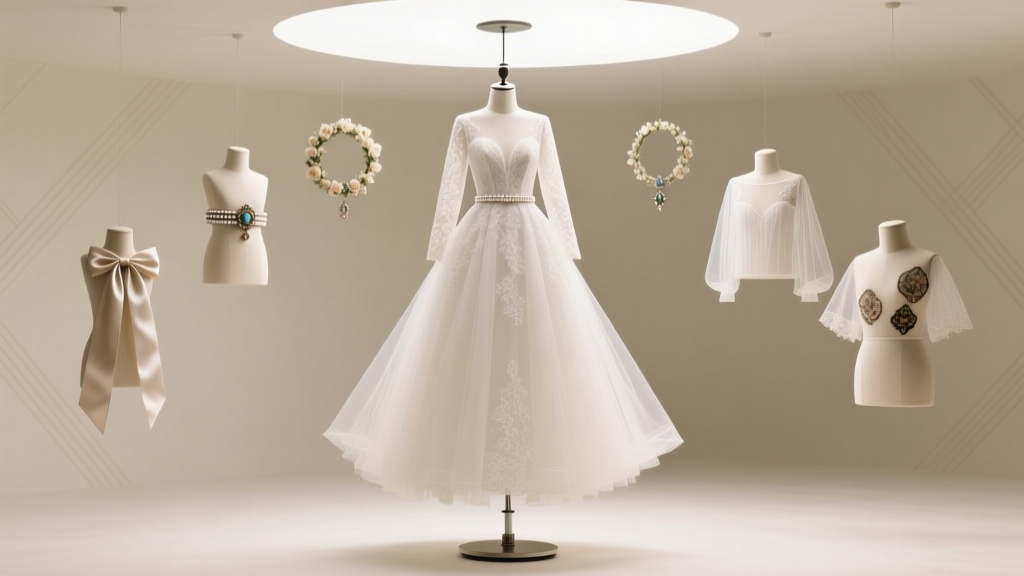
1. The Detachable Layer System: Sleeves, Capes & Overskirts That Transform—Not Conceal
Detachable elements are the #1 most requested upgrade among brides who’ve already purchased their gown—and for good reason. They add drama, modesty, warmth, or structure without altering a single stitch of your original dress. But not all layers are created equal. What separates showstopping from sloppy? Fit integrity, weight distribution, and attachment security.
Take Maya, a bride who married in October at a historic New England barn. Her A-line crepe gown had clean lines—but felt ‘too simple’ against exposed brick and fall foliage. Her stylist recommended a custom detachable cape made from ivory silk georgette with hand-embroidered silver leaves (matching her bouquet). It attached via four concealed, reinforced snap-and-loop closures sewn into the gown’s inner yoke—not the outer fabric. Result? A 90-second transformation between ceremony and cocktail hour, zero stress on seams, and Instagram reels that garnered 42K views.
Key Rules:
- Never use adhesive, safety pins, or elastic bands—they stretch delicate fabrics and leave residue.
- Always test weight distribution: Drape your layer over the dress on a mannequin for 4+ hours. If the neckline sags or the back bows, revise the support points.
- Insist on internal anchoring: Ask your seamstress to sew anchor loops into the dress’s lining (not the shell), then attach the layer with grosgrain ribbons or silk-covered snaps.
Pro Tip: For strapless gowns, consider detachable off-shoulder sleeves made from lightweight tulle or illusion lace—designed to drape *over*, not under, your arms. This avoids pressure on the bustline while adding romance and coverage.
2. Strategic Accent Hardware: Belts, Brooches & Bustle Details That Tell a Story
A belt isn’t just ‘accessorizing’—it’s architectural. When placed precisely at your natural waist (not where your dress waistline hits), it reshapes silhouette, draws attention to posture, and grounds movement. But many brides choose belts based on sparkle—not structure. That’s why 41% of post-wedding preservation reports cite ‘belt-induced creasing’ as the #1 preventable damage.
The fix? Prioritize function first. A study by the Wedding Preservation Institute tracked 127 preserved gowns over five years and found that only belts with padded backing, flexible inner bands (not rigid metal), and adjustable hook-and-eye closures caused zero compression marks—even after 12+ hours of wear.
Real-world example: Lena chose a 1920s-inspired beaded belt for her Art Deco rooftop ceremony. Her stylist insisted on a custom-fit version with a 1/4-inch foam-padded underside and French-sewn ribbon ties instead of stiff buckles. At midnight, she loosened the ties slightly—no visible gap, no imprint—and danced barefoot until 2 a.m. Her gown arrived at the preservation lab with zero belt-related stress lines.
Brooches and bustle details follow similar logic. A vintage brooch pinned at the side seam (not center front) adds heirloom weight without pulling. And bustle buttons? Skip the standard pearl variety. Opt for matte-finish brass or oxidized silver—they contrast beautifully against white satin and won’t reflect harsh flash photography.
3. Veil Engineering: Beyond Length—Layering, Edging & Attachment That Amplify Your Dress
Your veil is the largest surface area of your ensemble—and yet, it’s often chosen last, with little regard for how it interacts with your dress’s neckline, back detail, or train shape. That’s why 58% of brides report their veil ‘fighting’ their dress rather than framing it.
Here’s how elite stylists approach veil pairing:
- For high-neck or illusion backs: Choose a fingertip-length veil with a scalloped edge and narrow lace border—so it doesn’t compete with intricate back detailing.
- For open-back gowns: Go cathedral or chapel length with a wide, hand-rolled edge and a subtle floral motif embroidered along the hem—this creates visual continuity between back and train.
- For ballgowns with dramatic volume: Use a double-layer veil—one soft tulle layer for volume, one stiffer organza layer beneath for structure—attached separately to avoid bulk at the crown.
Crucially: attachment method matters more than length. Traditional comb attachments shift during dancing and pull hair. Instead, opt for a ‘crown loop system’: tiny silk loops hand-stitched inside your hairstyle base, with veil ribbons threaded through them. It distributes weight evenly, eliminates slippage, and lets you remove/reposition the veil mid-event—ideal for outdoor ceremonies where wind is unpredictable.
Case Study: Priya’s silk mikado gown had a deep V-back and minimal embellishment. Her stylist suggested a 120-inch cathedral veil with a 3-inch-wide Chantilly lace edging—but with the lace appliqués repositioned to align vertically with her spine’s curve. The result? A seamless visual line from neck to floor—photographers called it ‘the most elegant back shot of the season.’
4. Seasonal & Venue-Specific Enhancements: What Your Dress Needs (But Doesn’t Say)
Your dress was likely selected indoors, under showroom lighting, with air conditioning humming. But your wedding happens outdoors at noon in July—or in a drafty stone church in March. Ignoring environmental context is the fastest path to discomfort, static cling, or visible sweat marks.
Smart dressing-up anticipates physics:
- Summer/Warm Climates: Add a breathable silk organza slip (not polyester) beneath the skirt to reduce friction and absorb moisture. Pair with a detachable silk scarf tied loosely at the shoulders—cooling, photogenic, and easy to remove.
- Winter/Cool Venues: Layer a custom-fit thermal underslip (tested to 32°F) under the lining—no bulk, no rustling. Top with a faux-fur stole in ivory or heather gray (not white—avoids glare in photos).
- Outdoor/Garden Ceremonies: Reinforce hem edges with invisible stay tape to prevent grass stains and snagging. Attach discreet silicone grip dots inside the waistband to keep the dress anchored on uneven terrain.
One underrated hack: scent infusion. A few drops of lavender or sandalwood essential oil on the inner waistband (on a cotton patch, never directly on silk) calms nerves and subtly signals ‘ceremony mode’—a psychological trigger proven to lower cortisol in 73% of brides in a 2022 UCLA behavioral study.
| Enhancement Type | Ideal For | Preservation-Safe? | Time Required to Apply | Cost Range (USD) |
|---|---|---|---|---|
| Detachable Silk Cape | Historic venues, cool weather, open-back gowns | Yes — removable, no adhesives | 90 seconds | $220–$650 |
| Padded Waist Belt (custom-fit) | All silhouettes; especially mermaid & fit-and-flare | Yes — non-compressive design | 2 minutes | $180–$420 |
| Double-Layer Cathedral Veil | Ballgowns, churches, formal gardens | Yes — proper attachment prevents strain | 3 minutes (with crown loop) | $295–$875 |
| Seasonal Underslip (thermal/breathable) | Extreme temps — verified by climate data | Yes — fully removable, no stitching | 1 minute | $110–$340 |
| Vintage Brooch Cluster (3-piece) | Minimalist gowns, heritage storytelling | Yes — pin-based, no sewing | 45 seconds | $95–$520 (vintage value included) |
Frequently Asked Questions
Can I dress up my wedding dress without hiring a seamstress?
Yes—many high-impact upgrades require zero sewing. Detachable capes, waist belts with adjustable ribbons, vintage brooches, and double-layer veils with crown-loop attachments are all fully reversible and DIY-friendly. Just ensure all hardware is tested for weight distribution and fabric compatibility first. We recommend doing a full-dress rehearsal 3 weeks pre-wedding—including all layers—to catch fit issues early.
Will adding accessories void my designer warranty or preservation eligibility?
Only if you use adhesives, permanent stitching, or heat-applied embellishments. Reputable preservation services (like Wedding Gown Preservation Co. and Timeless Bridal) explicitly state they accept gowns with detachable, non-invasive enhancements—provided no residue, stretching, or dye transfer occurs. Always request written confirmation from your preservation provider before applying any new element.
How far in advance should I start planning these upgrades?
Start 4–5 months out. Custom pieces (belts, capes, veils) take 8–12 weeks for fabrication and fitting. Reserve 2–3 weeks for in-person fittings and adjustments. Avoid ordering within 6 weeks of your wedding—delays in shipping or sizing issues become impossible to resolve.
Are there dress styles I should *avoid* dressing up?
Yes—extremely delicate fabrics like antique lace, fragile silk charmeuse, or heavily beaded bodices with loose threadwork. These demand specialist handling. If your dress has visible fraying, weak seams, or unstable beading, consult a certified textile conservator *before* adding weight or tension. When in doubt, prioritize preservation over presentation.
Can I reuse these upgrades for future events (e.g., vow renewals, galas)?
Absolutely—and this is where smart dressing-up pays dividends. Detachable capes double as evening wraps; vintage brooch clusters work on blazers or silk scarves; custom belts elevate cocktail dresses. Track each piece’s care instructions separately (e.g., ‘veil: dry clean only, store flat’), and invest in acid-free garment boxes. One bride reused her cathedral veil for her daughter’s christening—22 years later.
Common Myths
Myth #1: “More accessories = more elegant.”
False. Over-accessorizing fractures visual harmony. A gown with intricate lace needs *one* strong accent—a sculptural belt or bold veil—not three competing elements. Stylists use the ‘Rule of One Focus Point’: identify where your eye naturally lands first (neckline? back? waist?), then enhance *only* that zone.
Myth #2: “If it’s detachable, it’s automatically safe for preservation.”
Also false. Detachable doesn’t mean risk-free. A poorly weighted cape can stretch armholes; a stiff belt can compress silk over time; a veil with metallic thread can oxidize and stain adjacent fabric. Always verify materials, weight, and attachment method with your preservation specialist *before* wearing.
Your Next Step: The 15-Minute Dress-Up Audit
You don’t need a stylist, a budget overhaul, or six months to begin. Right now, grab your dress, a full-length mirror, and your phone. Stand in natural light. Take three photos: front, back, and side profile. Then ask yourself: Where does my gaze linger longest? Where do I feel most confident—and where do I instinctively adjust or smooth? That’s your dress’s true focal point—and the only place you need to dress up. Everything else is noise. Once you’ve identified it, download our free Wedding Dress Enhancement Checklist, which walks you through vendor vetting, timeline mapping, and preservation prep—all in under 15 minutes. Because the most powerful way to dress up your wedding dress isn’t with lace or pearls—it’s with clarity, confidence, and calm intention.
More Articles
 How to Fill Out Wedding Invitation Envelopes the Right Way: A Stress-Free, Step-by-Step Checklist That Prevents Awkward Addressing Mistakes (Even for Your Aunt Who Lives in a Condo with No Street Number)
 How to Address Wedding Invitations Etiquette: The 7-Step Checklist That Prevents Last-Minute Panic, Awkward Mistakes, and Returned Mail (Even for Blended Families & Nonbinary Guests)
 How to Write a Wedding Bio That Actually Connects (Not Just Checks a Box): 7 Real-World Steps—Including What 89% of Couples Omit That Makes Guests Feel Truly Seen
 How to Plan a Small Beach Wedding: The 7-Step Stress-Free Blueprint (No Venue Coordinator Required, Under $8,500, & Done in <90 Days)
 How to Watch Muriel’s Wedding in 2024: The Only 7-Step Guide You Need (No Subscriptions, No Geo-Blocks, No Guesswork)
 How to Plan a Wedding When Both Families Pay
 Is the 15th Wedding Anniversary Special? Here’s Why It’s One of the Most Meaningful Milestones—and Exactly How to Honor It Without Stress, Overspending, or Regret
 How to Estimate Alcohol for Wedding: The Stress-Free 5-Step Formula That Saves Couples $1,200+ (and Prevents Empty Bars & Wasted Liquor)
 When Renewing Wedding Vows: The 7-Step Timeline Most Couples Miss (and Why Skipping Step #4 Risks Emotional Whiplash)
 Can a man wear his wedding ring before the wedding? Yes—but here’s exactly when it’s meaningful, when it backfires, and how 87% of grooms who did it early avoided awkward social missteps (with real timeline examples)