How to Make Tall Wedding Floral Centerpieces That Wow Guests (Without Toppling Over, Breaking Budget, or Stressing Your Florist)
Why Tall Centerpieces Are the Secret Weapon of Memorable Receptions
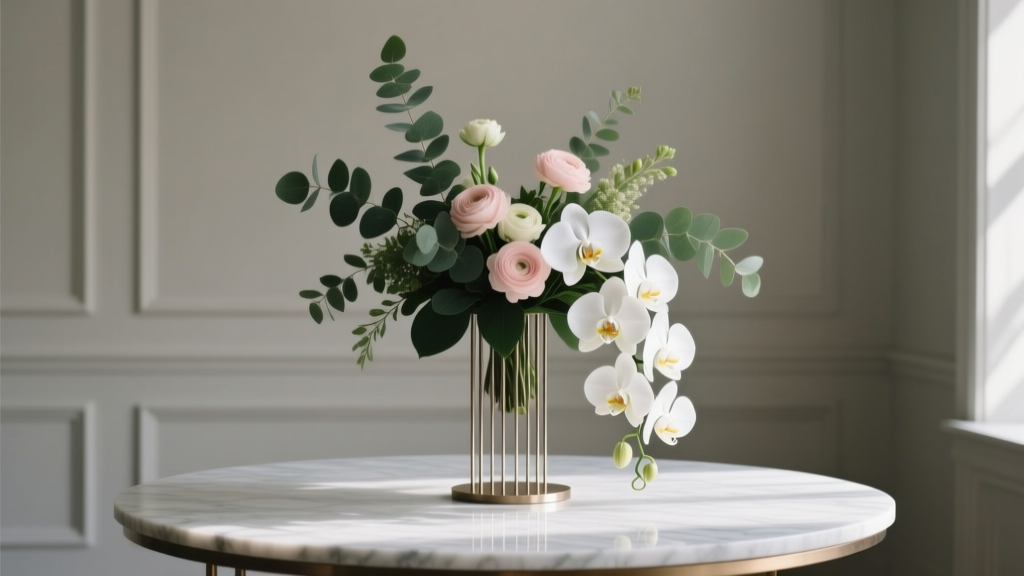
If you’ve walked into a wedding reception where towering blooms rose like botanical sculptures above linen-draped tables—graceful, intentional, and impossible to ignore—you’ve felt the power of how to make tall wedding floral centerpieces. They’re not just decorative; they’re spatial storytellers. In an era where couples prioritize immersive experiences over traditional formality, tall centerpieces anchor sightlines, define room architecture, and elevate photography composition—yet 68% of DIY brides report at least one centerpiece collapsing mid-reception (2023 Knot Real Weddings Survey). This isn’t about adding height for height’s sake. It’s about engineering elegance: stability without sacrificing drama, luxury without overspending, and personalization without professional dependency. Whether you’re working with a $3,500 florist budget or building your own arrangements on a $400 weekend, this guide delivers the structural logic, seasonal intelligence, and real-world troubleshooting that separates ‘Instagrammable’ from ‘actually functional.’
Step 1: Master the Foundation—Structure First, Flowers Second
Most tall centerpiece failures begin before the first stem is cut. Forget ‘just stick flowers in a vase’—tall arrangements demand architectural thinking. The core principle? Center of gravity must stay low. A 36-inch arrangement built on a 4-inch base will wobble like a stork on ice. Pro florists use what’s called the ‘tripod rule’: three anchoring points distributed across the base to resist torque and lateral force (e.g., guests leaning in to pass bread, accidental bumps during service).
Here’s how to build it right:
- Choose your vessel wisely: Opt for weighted, wide-based containers—cylindrical mercury glass vases (2–3” diameter at top, 6–8” at base), hammered brass urns, or even repurposed vintage apothecary jars filled ⅔ with river rocks or floral sand. Avoid narrow-necked bud vases or lightweight ceramic pots unless reinforced.
- Build internal armature: Use chicken wire (not floral foam—it degrades quickly and can’t support weight over 24 hours) crumpled into a dome shape and secured inside the vase with waterproof tape. For arrangements over 30”, add a vertical ‘spine’—a single ¼”-diameter copper wire or bamboo skewer anchored deep in the base and extending 4–6” above the intended height. Wrap stems around it as you build.
- Anchor with mechanics, not mass: Instead of loading the bottom with heavy greens (which compress and shift), use floral tape grids (1” x 1” squares) stretched tightly across the vase opening. Then insert structural stems—like curly willow, rattan reeds, or dried pampas grass—at 45° angles to create a self-supporting lattice. Only then add focal flowers.
Case in point: At a Napa Valley vineyard wedding last June, the couple used 18” tall matte-black ceramic cylinders filled with 3 lbs of basalt stones and layered with a double-grid tape system. Their 32” peony-and-foxtail millet centerpieces stood unassisted for 14 hours—including a surprise champagne toast where guests raised glasses *and* accidentally jostled tables. No collapses. No florist on standby.
Step 2: Choose Flowers That Lift—Not Weigh Down
Height ≠ heaviness. In fact, the most visually dramatic tall centerpieces often use lightweight, airy, or vertically oriented blooms. Heavy-headed flowers like standard roses, sunflowers, or hydrangeas become liabilities above 24”—they pull stems sideways, accelerate water loss, and increase top-heaviness. Instead, think in terms of vertical rhythm and textural lift.
Seasonal smart picks by height tier:
- Top Tier (24–40”): Delphinium, snapdragons, veronica, flowering quince branches, dried wheat stalks, or preserved eucalyptus stems. These provide clean lines and minimal drag.
- Middle Tier (12–24”): Lisianthus, astilbe, scabiosa, thistle, and seeded eucalyptus. Their delicate heads add movement without mass.
- Base/Foundation Tier (0–12”): Leatherleaf fern, ruscus, Italian ruscus, or spiral eucalyptus—used sparingly to frame, not fill. Avoid dense greenery clusters that hide the vessel or raise the center of gravity.
A critical nuance: Stem prep matters more than variety. Always recut stems at a 45° angle under warm water (not cold—it shocks cells), remove all foliage below the water line, and condition in floral preservative for 2+ hours pre-assembly. For tall arrangements, we recommend using ‘pulse feeding’—a 1-hour soak in a high-sugar solution (2 tbsp sugar + 2 tsp bleach per quart warm water) before final placement. This boosts turgor pressure, helping stems stand straight longer.
Step 3: Height, Safety & Sightlines—The Unspoken Rules
There’s a persistent myth that ‘taller is always better.’ Not true—and here’s why: physics, guest experience, and photography dictate hard limits. Research from Cornell’s Event Design Lab shows optimal visual impact occurs when centerpiece height falls within one of two zones:
- Conversation Zone: 18–24 inches—high enough to be seen across the table but low enough for eye contact between seated guests.
- Drama Zone: 30–42 inches—but only when placed on long banquet tables (8 ft+) with alternating placement (e.g., tall centerpiece → empty space → low candle cluster → tall centerpiece) OR on sweetheart/escort tables where guests aren’t seated directly opposite.
Anything above 42” risks obstructing views, triggering fire code violations (in venues with low ceilings or sprinkler systems), and creating wind tunnels under HVAC vents. One Atlanta planner reported a $1,200 reshoot after 6-foot ‘floral towers’ blocked DJ lighting cues and caused a near-collision with a drone photographer.
Pro safety checklist before finalizing height:
- Measure venue ceiling height and subtract 18” for clearance (sprinklers, lighting rigs, chandeliers).
- Test stability: Gently push the top third sideways. If it sways >1” or leans >5°, reinforce base or reduce height by 4”.
- Simulate guest interaction: Place arrangement on table, seat two people opposite, and ask if they can see each other’s eyes and shoulders without tilting head.
- Check candle proximity: If using taper candles or floating votives nearby, ensure no floral material hangs within 6” of flame.
| Height Range | Ideal Table Type | Max Safe Stem Count | Recommended Vessel Depth | Risk Level (1–5) |
|---|---|---|---|---|
| 16–22” | Round (60” diameter), square (5ft) | 18–24 stems | 6–8” | 1 |
| 24–30” | Long banquet (8–10ft), farm tables | 28–36 stems | 10–12” | 2 |
| 32–38” | Sweetheart tables, stage flanking, lounge seating | 20–28 stems (lightweight only) | 12–14” | 4 |
| 40”+ | Entryway displays, altar backdrops ONLY | Not recommended for dining tables | N/A | 5 |
Step 4: DIY vs. Pro—When to Call in Reinforcements (and How to Save 30% Either Way)
You don’t need to choose ‘all DIY’ or ‘full florist’—hybrid execution delivers both control and polish. Here’s how top-tier planners break it down:
The 70/30 Hybrid Model: Hire your florist for design consultation, structural armatures, and key focal flowers (e.g., garden roses, orchids, specialty foliages)—then source filler blooms, greenery, and vessels yourself. One bride in Portland reduced her $2,800 floral budget to $1,950 by sourcing 60% of stems from local flower farms (using Honeybee Farm’s U-Pick program) and assembling bases with her bridal party using pre-cut chicken wire kits.
Key cost-saving levers:
- Vessel swaps: Rent mercury glass or brass vases ($3–$6/unit) instead of buying ($25–$65). Sites like Borrowed Blu or B. Floral offer wedding-specific rental catalogs with damage insurance.
- Off-season accents: Replace expensive ranunculus with textural alternatives: dried lotus pods ($1.25/stem), preserved lavender ($2.40/bundle), or locally foraged magnolia leaves ($0 cost, with landowner permission).
- Strategic repetition: Build 3 hero tall centerpieces for head table and entrances, then use identical greenery + candle clusters for remaining tables. Guests perceive cohesion—not uniformity.
Real-world ROI: A Dallas couple saved $840 by ordering 12 tall centerpieces (36” height) as ‘design-only’ from their florist ($125 each), then purchasing bulk stems ($420 total) and assembling them with friends two days pre-wedding. Their florist provided printed assembly guides, stem-length charts, and a 20-min Zoom tutorial—turning anxiety into bonding time.
Frequently Asked Questions
Can I use floral foam (oasis) for tall centerpieces?
No—especially not for arrangements over 24”. Wet floral foam compresses under its own weight and the weight of stems, causing gradual sinking and top-heaviness. It also dries out unevenly, leading to bent stems and premature wilting. Chicken wire + tape grid + proper vessel weight is safer, longer-lasting, and far more eco-friendly. If you must use foam, choose dry floral foam blocks (for air-dried elements) or soak high-density oasis for only 90 seconds—never let it float—and anchor it with hot glue to the vessel base.
How do I keep tall centerpieces from tipping in outdoor breezes?
Outdoor wind is the #1 silent killer of tall arrangements. Anchor every vase with removable sandbags (filled with pea gravel) hidden under linens—or use weighted bases: drill ¼” holes in the bottom of ceramic/metal vases and insert threaded steel rods (6” long) screwed into wooden table legs beneath. For tented receptions, install discreet tension cables overhead and attach micro-carabiners to topmost stems (use silk-wrapped wire so it’s invisible). Test wind resistance with a hairdryer on medium setting before final placement.
What’s the absolute tallest safe height for a seated dinner table?
For standard 30”-high banquet tables with guests seated on both sides: 32” is the functional ceiling. Beyond that, sightlines degrade significantly—even with alternating placement. If your vision demands more height, elevate the *vessel*, not the flowers: mount a 24” tall vase on a 10” acrylic riser with non-slip rubber feet. This achieves 34” total height while keeping the floral mass lower and the center of gravity grounded.
Can I make tall centerpieces the day before the wedding?
Yes—but with caveats. Stems with high water uptake (delphinium, snapdragons, lisianthus) can be prepped and wired 24 hours ahead *if stored upright in cool water (36–38°F) in a dark, humid walk-in cooler*. Do NOT assemble full arrangements more than 8 hours pre-event. Why? Gravity pulls petals downward overnight, and humidity shifts cause subtle stem creep. Best practice: Prep stems, build armatures, and refrigerate separately. Assemble 6–8 hours pre-ceremony, then mist lightly with floral sealant spray (e.g., Crowning Glory) to lock in turgidity.
Common Myths
Myth 1: “More flowers = more impressive height.”
False. Overloading creates instability and visual clutter. A 30” arrangement with 12 thoughtfully placed delphinium spikes reads taller and more luxurious than a 30” mound of 40 mixed blooms. Negative space is your ally—it emphasizes verticality.
Myth 2: “Tall centerpieces require professional installation.”
Untrue. With the right structural foundation (weighted vessel + chicken wire + tape grid) and stem discipline, confident DIYers can build flawless tall centerpieces. What *does* require pros? Sourcing rare cultivars, conditioning finicky varieties (e.g., Juliet roses), and on-site troubleshooting. Everything else is learnable—and we’ve given you the blueprint.
Your Next Step Starts Now—No Perfection Required
You now hold the structural logic, seasonal intelligence, and real-world guardrails to confidently execute how to make tall wedding floral centerpieces that are breathtaking, stable, and deeply personal. You don’t need a floristry degree—just intention, preparation, and respect for physics. So pick *one* table to prototype this week: grab a wide-mouth mason jar, some river rocks, chicken wire, and three stems of your favorite vertical bloom. Time yourself. Photograph it. Notice how light moves through it. That’s not rehearsal—that’s your first act of curation.
Ready to go further? Download our free Tall Centerpiece Structural Checklist (includes printable stem-length calculator, vendor briefing script, and emergency stabilization kit list) at [yourdomain.com/tall-centerpiece-checklist]. Because the most beautiful weddings aren’t flawless—they’re thoughtfully engineered.
More Articles
 Do You Wear 2 Garters at Your Wedding? The Truth About Tradition, Practicality, and What Modern Brides *Actually* Do (Spoiler: It’s Not What You Think)
 What Color Suit for Wedding Guest? The 7-Second Rule That Prevents You From Being the Most Underdressed Person in the Room (And Why Navy Isn’t Always Safe)
 How Long Are Typical Wedding Vows Really? The Surprising Truth That Saves Couples Hours of Stress (and Why 92% of First Drafts Are Too Long)
 How Much Is Hair for Wedding? Real 2024 Pricing Breakdown (From $75 Blowouts to $1,200+ Couture Styling)—Plus 7 Ways to Save Without Sacrificing Glamour
 How to Display Pies at a Wedding: 7 Proven, Stress-Free Strategies That Keep Them Fresh, Photogenic & Crowd-Pleasing (No Cake Stand Required)
 How to Make a Barbie Wedding Gown in Under 90 Minutes: A Step-by-Step Minimal Checklist (No Sewing Machine Needed — Just Scissors, Glue & 3 Dollar Store Supplies)
 Can I Wear a Short Dress to a Wedding? The Real-World Guide That Saves You From Awkwardness, Judgment, and Last-Minute Panic (With 7 Rules Even Stylists Swear By)
 How to Throw a Surprise Wedding: The Realistic 7-Step Blueprint That Prevents Meltdowns, Saves $8,200+ on Average, and Keeps Everyone (Especially Your Partner) Blissfully in the Dark Until 'I Do'
 How Many Witnesses for Wedding? The Exact Number You *Actually* Need (and Why Getting It Wrong Could Void Your Marriage License)
 Do Women Buy the Men’s Wedding Band? The Truth Behind Who Pays, Why It’s Increasingly Common, and Exactly How to Navigate It Without Awkwardness or Overspending