How to Plan a Wedding With a Dessert Table Instead of Cake
You’re not alone if the traditional tiered wedding cake doesn’t feel like “you.” Maybe you’ve never loved cake, maybe you want more variety, or maybe you’re picturing a reception that feels more like a stylish cocktail party than a formal banquet. A dessert table can be the perfect way to make your wedding feel personal, modern, and guest-friendly—without sacrificing that sweet “moment” everyone looks forward to.
Couples also choose dessert tables for practical reasons: they can be easier to customize for dietary needs, simpler to serve, and often more budget-flexible than a large, multi-tier cake. The best part? You can still have a beautiful focal point for photos and a special “first dessert” moment—just with treats you actually want to eat.
This guide walks you through exactly how to plan a wedding dessert table instead of cake, from quantities and menu planning to styling, timeline, and common mistakes to avoid.
Why Choose a Dessert Table Instead of a Wedding Cake?
A dessert table can be more than a cute display—it’s a strategy for keeping guests happy and your planning simpler.
- Variety for guests: Different flavors, textures, and dietary options mean more people find something they love.
- Flexible budget: You can mix “splurge” items (like macarons) with budget-friendly bites (like brownies or donut holes).
- Easier serving: Many desserts are pre-portioned, so fewer messy slices and fewer staffing needs.
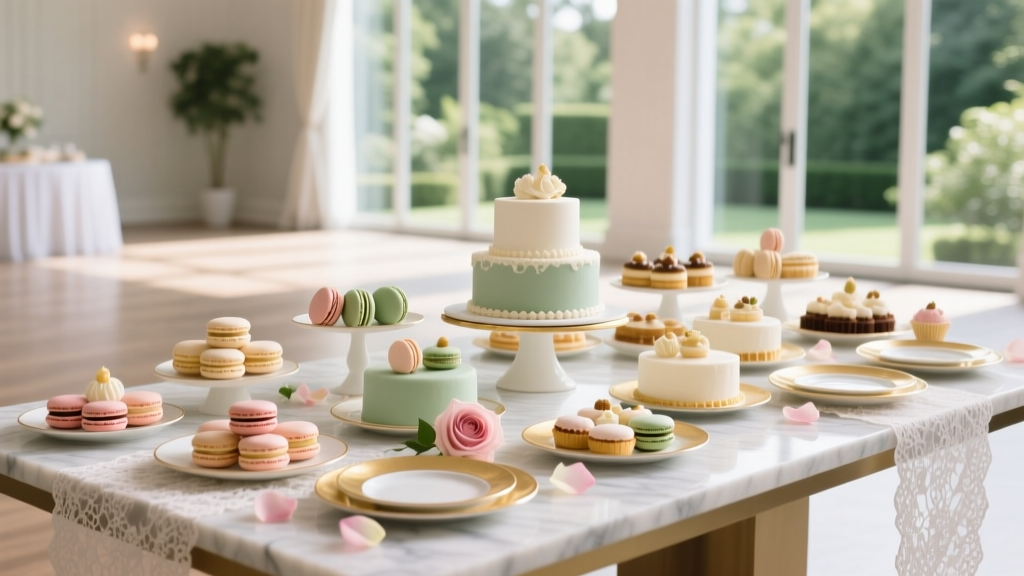
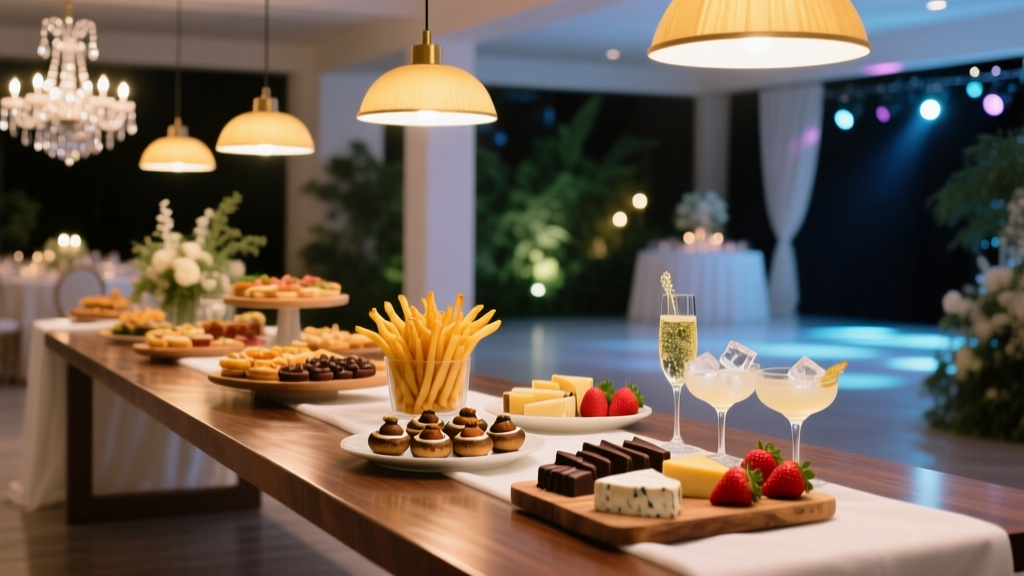
- Visual impact: A styled dessert spread can look just as showstopping as a cake—sometimes more.
- Personal story: Feature family recipes, cultural sweets, or treats from your first date.
Step-by-Step: How to Plan Your Wedding Dessert Table
Step 1: Decide the “Role” of Dessert at Your Reception
Start by choosing how big of a moment dessert will be. This decision affects quantities, staffing, and budget.
- Dessert is the main event: Your guests expect a full dessert experience (best for evening receptions).
- Dessert is a light finish: A smaller spread works if you’re doing late-night snacks, or if dinner is heavy.
- Dessert doubles as favors: Packaged treats guests can take home (great for minimizing leftovers).
Real-world scenario: A couple hosting a 6:00 PM garden wedding with plated dinner may choose a full dessert table at 8:00 PM. A brunch wedding might do mini pastries and coffee service right after the meal, with smaller quantities.
Step 2: Set Your Dessert Table Budget (Without Guessing)
Dessert tables can range widely in cost depending on what you serve and who makes it. Use these planning benchmarks to get realistic fast:
- Budget-friendly: $3–$6 per guest (mix of simple items, some store-bought, minimal custom décor)
- Mid-range: $6–$10 per guest (professional baker, cohesive styling, custom labels/signage)
- Luxury: $10–$18+ per guest (high-end patisserie, macarons, custom installations, staffing)
Cost-saving mix-and-match idea: Order one “hero” dessert (like macarons or mini tarts) and supplement with crowd-pleasers like brownies, cookies, and chocolate-covered pretzels.
Step 3: Choose a Dessert Menu That Feels Cohesive
The secret to a dessert table that looks intentional (not random) is planning variety with a theme.
A balanced dessert table usually includes:
- 1–2 creamy items: mini cheesecakes, pudding cups, mousse, panna cotta
- 1–2 baked items: cookies, brownies, bars, mini cupcakes
- 1–2 “wow” items: macarons, petit fours, mini tarts, éclairs
- 1 fruit-forward option: lemon bars, berry tartlets, fruit skewers
- Optional warm/interactive station: s’mores, churros, crepes, or a doughnut wall (venue permitting)
Keep portions small: Mini desserts are easier for guests to try more than one and reduce waste.
Real-world scenario: If your wedding theme is “Italian summer,” consider cannoli, tiramisu cups, amaretti cookies, and lemon ricotta cake bites. For a modern black-tie vibe, go with macarons, chocolate truffles, mini opera cakes, and champagne-flavored jelly cups.
Step 4: Plan Quantities (So You Don’t Run Out—or Overbuy)
This is where couples often feel stuck. A dependable approach is to plan for 2–3 dessert pieces per guest if dessert is served after dinner. If you have a big sweet-tooth crowd or lighter dinner, aim for 3–4 pieces.
Quick quantity guide:
- After dinner dessert table: 2–3 pieces per guest
- Brunch or afternoon tea vibe: 3–4 pieces per guest
- Late-night dessert only: 1–2 pieces per guest (especially if alcohol is served)
Example: 120 guests x 3 pieces = 360 pieces total. If you’re offering 6 dessert types, that’s about 60 pieces of each (adjusting for popularity—cookies and brownies disappear fast).
Pro tip from planners: Make 25–30% of the table “high-volume favorites” (cookies, bars) and 10–15% “luxury bites” (macarons, petite tarts). Guests love variety, but they gravitate to familiar options.
Step 5: Don’t Forget Dietary Needs (Without Making It Complicated)
Offering a few inclusive options is a thoughtful touch and avoids awkward moments.
- Gluten-free: flourless chocolate cake bites, macarons, meringues (verify ingredients)
- Dairy-free/vegan: sorbet cups, vegan cookies, coconut panna cotta
- Nut-free: clearly label and keep physically separated to reduce cross-contact
Labeling is everything: Small tent cards that note “GF” or “contains nuts” prevent guests from guessing—and make your table feel polished.
Step 6: Design and Layout—Make It Beautiful and Easy to Serve
A great dessert table is both pretty and functional. Think of it like a tiny buffet: traffic flow matters.
Setup checklist:
- Choose a location away from the dance floor bottleneck but visible enough to draw guests in
- Use varying heights: cake stands, risers, crates (covered), or tiered trays
- Provide serving tools for each item: tongs, small scoops, mini forks, cocktail napkins
- Place plates at the beginning and napkins at both ends (guests will approach from both sides)
- Include a small trash/napkin discard station nearby (hidden if possible)
Styling tip: Choose one anchor element—like a floral arrangement, neon sign, or a framed “Sweet Treats” sign—and build around it. You want the table to look intentional in photos, especially during your reception detail shots.
Step 7: Decide How (and When) Dessert Will Be Served
Your dessert table timeline can make or break the experience. You’re aiming for “fresh and fun,” not “melted and picked over.”
Common timing options:
- After dinner (classic): Announce dessert right after toasts or first dance.
- Open all night (casual): Works best with sturdier items (cookies, brownies) and a staffed refresh.
- Late-night reveal: Bring it out 1–2 hours after dancing starts for a second wind.
Timeline example (evening reception):
- 5:30 PM: Cocktail hour
- 6:30 PM: Dinner service begins
- 7:45 PM: Toasts
- 8:15 PM: First dance + parent dances
- 8:30 PM: Dessert table opens (DJ makes a quick announcement)
- 9:30 PM: Late-night snack (optional)
Pro tip: If you want that classic “cake moment,” do a mini ceremonial dessert—like cutting a small pie, sharing a first bite of tiramisu, or clinking forks over a donut tower. It photographs beautifully and keeps traditions in a way that still feels true to you.
Real-World Dessert Table Ideas Couples Love
The “Mini Everything” Table (Perfect for Big Guest Lists)
- Mini cupcakes in two flavors
- Brownie bites
- Lemon bar squares
- Mini cheesecake cups
- Chocolate-dipped strawberries
Best for: 100–250 guests, venues with limited plating, couples who want something universally appealing.
The Cultural Dessert Table (Meaningful and Memorable)
- Baklava and Turkish delight
- Alfajores and churro bites
- Mochi and matcha cookies
- Gulab jamun or ladoo
Best for: Multicultural weddings, couples honoring family traditions, and guests who love trying new flavors.
The “Coffeehouse” Dessert Table (Cozy and Budget-Smart)
- Assorted cookies
- Donut holes or a donut wall
- Biscotti
- Seasonal fruit
- Coffee and espresso bar
Best for: Brunch weddings, winter weddings, and couples who want a relaxed vibe.
Common Mistakes to Avoid (And How to Fix Them)
- Mistake: Not ordering enough.
Fix: Use the 2–3 pieces per guest rule, and add extra of the fastest movers (cookies, brownies). - Mistake: Too many flavors, no cohesion.
Fix: Pick a theme (seasonal, cultural, favorite desserts) and keep the menu to 5–8 items. - Mistake: Forgetting serving tools and plates.
Fix: Assign someone (planner, caterer, day-of coordinator) to do a “dessert table tool check” before guests enter. - Mistake: Melting or wilting desserts.
Fix: Avoid fragile items outdoors (whipped cream, buttercream) unless you have climate control. Keep backup trays chilled and refresh as needed. - Mistake: Setting it up too early.
Fix: Stage non-perishables early, but add delicate items closer to serving time.
Wedding Planner Pro Tips for a Smooth Dessert Table
- Assign a “dessert captain.” This can be your coordinator, caterer, or a trusted friend—someone responsible for restocking and keeping it tidy.
- Use doubles of popular items. Put cookies on two platters in different spots so guests don’t crowd one area.
- Think about lighting. If the table is in a darker corner, add candles (venue-approved) or a small spotlight. Photos matter here.
- Plan takeaway packaging. A small basket of paper bags or favor boxes encourages guests to grab dessert and reduces leftovers.
- Have a backup plan for leftovers. Decide who takes them home, and bring a few containers. Future-you will be grateful.
Dessert Table Timeline: When to Book and When to Decide
- 6–9 months before: Choose dessert table vs. cake, confirm venue rules (outside desserts, refrigeration, staffing).
- 4–6 months before: Book baker(s) or dessert vendor; consider tastings.
- 2–3 months before: Finalize menu and approximate quantities; decide on labels, stands, and styling.
- 4–6 weeks before: Confirm logistics—delivery time, setup time, table size, linens, and who provides servingware.
- 1 week before: Share the final dessert timeline with your planner/coordinator and DJ/band for announcements.
FAQ: Dessert Tables Instead of Wedding Cake
Do we still need a “cutting cake” if we have a dessert table?
No. Many couples skip it entirely. If you want the photo moment, you can do a small ceremonial dessert (a mini cake, pie, or stack of donuts) without serving it to everyone.
Is a dessert table cheaper than a traditional wedding cake?
It can be, especially if you mix professional desserts with simpler options. Costs rise when you choose high-end items (like macarons), add staffing, or create elaborate displays. A clear per-guest budget helps you compare fairly.
How do we keep desserts fresh during the reception?
Use sturdy desserts that hold up at room temperature, keep backups chilled, and have your “dessert captain” restock in smaller batches. If you’re outdoors, avoid delicate creams and frostings unless you have cooling.
What size table do we need for a wedding dessert table?
For most weddings, a 6–8 foot table works for a moderate spread, but you may want 10–12 feet (or two tables) for 150+ guests or lots of variety. Ask your vendor how much footprint each dessert requires and plan for height with risers to save space.
Can we do a dessert table with a small catering team or no staff?
Yes, if you choose pre-portioned desserts and set up smart. You’ll still need someone to keep it tidy, replace empty platters, and handle any melting or mess. Even one assigned helper makes a big difference.
How do we tell guests there’s no cake?
Most guests will be delighted as soon as they see the spread. A simple sign like “Dessert Bar” and a quick DJ announcement (“Dessert is now open!”) prevents confusion and gets people excited.
Your Next Steps: A Simple Dessert Table Action Plan
- Decide your dessert vibe: light finish, full spread, or late-night reveal.
- Set a per-guest budget and choose 5–8 dessert types.
- Estimate quantities using 2–3 pieces per guest (adjust for timing and crowd).
- Confirm venue logistics: table size, linens, refrigeration, outside vendor rules.
- Assign a “dessert captain” for restocking and presentation.
- Plan your timeline and a short announcement so guests know when it’s open.
You can absolutely have a wedding that feels timeless and celebratory without a traditional cake. A dessert table gives you room to be creative, thoughtful, and guest-focused—while making your reception feel unmistakably yours.
Signoff: For more wedding planning tips, timelines, and reception ideas, explore the other guides on weddingsift.com.
More Articles
 How to Plan a Wedding Ceremony and Reception at Different Venues
 Wedding Planning Contracts and Legal Documents Guide
 Wedding Venue Questions You Must Ask Before Signing
 How to Plan a Luxury Wedding Without Breaking the Bank
 Wedding Guest List Etiquette Who to Invite and Who Not To
 How to Plan a Wedding With a Late-Night Snack Station
 How to Plan a Wedding With a First Dance Song
 How to Plan a Wedding With a Ceremony Aisle Decor
 How to Plan a Wedding With a Guest Book Alternative
 Ultimate Wedding Planning Checklist for Your Big Day