
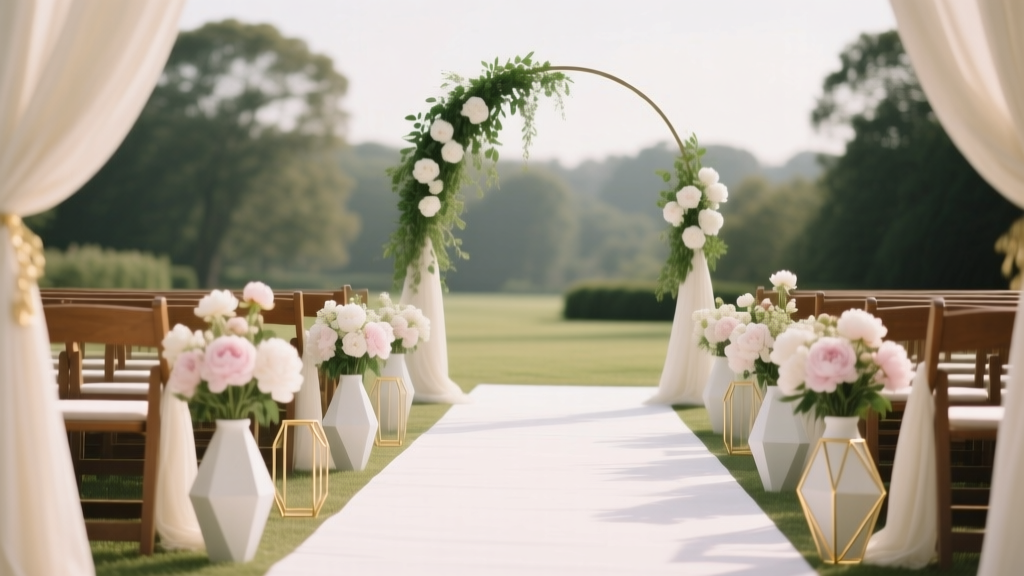
Wedding Planning How to Choose Ceremony Aisle Runners
There’s a moment in every ceremony that feels like time slows down: the first step into the aisle. Whether you’re walking solo, with a parent, with your partner, or surrounded by your wedding party, the aisle is the “runway” that frames the entire entrance—and it shows up in a lot of photos.
An aisle runner can be a beautiful finishing touch, but it’s also one of those details that sounds simple until you’re staring at options: fabric or paper, indoor or outdoor, plain or personalized, petals or no petals… and then you remember the wind exists. If you’re wondering what’s worth it, what will actually work at your venue, and how to avoid aisle-runner disasters, you’re in the right place.
This guide walks you through choosing an aisle runner that matches your ceremony style, fits your budget, and behaves on the day (no bunching, slipping, or muddy heartbreak). Think of it as advice from a wedding planner friend who’s seen the best—and the “we should’ve tested this” moments.
What an Aisle Runner Really Does (and When You Can Skip It)
Aisle runners are both practical and aesthetic. They can:
- Define the aisle in open spaces (gardens, lawns, large ballrooms).
- Protect a dress train from rough surfaces, outdoor dirt, or damp ground.
- Elevate photos by creating a clean, intentional path.
- Tie in your wedding decor with color, texture, or a monogram.
You can skip the runner if:
- Your venue already has a beautiful aisle (historic church tile, polished wood, a patterned carpet you love).
- You’re on grass and worried about wind + bunching more than you want the visual.
- You’d rather spend the money on florals, photography coverage, or guest experience.
Step-by-Step: How to Choose the Right Aisle Runner
Step 1: Start With Your Ceremony Surface
The surface determines almost everything—material, thickness, and how you secure it.
- Indoor carpet: Most runners work, but avoid super-slippery satin. Use aisle runner tape or double-sided carpet tape if allowed.
- Hard floors (wood, tile, concrete): Choose a runner with grip or plan to secure edges. Consider a thicker fabric runner to reduce slipping.
- Grass: Go heavier (canvas or thick fabric) and anchor it well. Lightweight runners can ripple or lift in the wind.
- Sand: Runners can sink or bunch. Consider skipping the runner and doing an aisle “marker” look with petals, pampas, or lanterns instead.
- Gravel/stone paths: Choose durable material (canvas) and accept that it may not lay perfectly flat.
Real-world scenario: If you’re having a backyard ceremony on lawn, a thin paper runner can tear the moment someone in heels shifts their weight. A canvas runner staked down at intervals will look cleaner and survive the processional.
Step 2: Match the Runner to Your Wedding Style
Think of your aisle runner as part of your ceremony decor, not a separate accessory.
- Classic/Traditional: White fabric runner, subtle edging, rose petals down the sides.
- Modern/Minimal: Solid ivory or soft gray runner; no petals; clean aisle chair arrangements.
- Rustic/Outdoor: Natural canvas runner, greenery clusters, wooden signage at the start of the aisle.
- Glam: Thicker fabric runner with a slight sheen (but not slippery), dramatic floral meadow at the aisle entrance.
- Boho: Textured runner layered with rugs (only if secured well), dried florals, pampas accents.
Pro tip: If your ceremony backdrop is already a showstopper (arch, florals, mountain view), keep the runner simple. If your venue is visually busy (patterned floors, colorful carpet), a runner can calm the look.
Step 3: Choose the Best Material for Your Venue
Here are the most common aisle runner materials and what they’re best for:
- Polyester fabric: Popular, affordable, and photo-friendly. Can wrinkle—steam or unroll early.
- Canvas: Great for outdoors, heavier weight, less likely to lift in wind. Often more expensive but very dependable.
- Non-woven fabric (felt-like): Budget-friendly and easy to cut; can snag on rough ground.
- Paper: Least expensive, best indoors on smooth surfaces. High risk outdoors; tears easily with heels.
- Burlap: Rustic look but can fray and may feel rough. Test it if anyone is walking barefoot or with delicate shoes.
- Custom vinyl (rare for aisles): Can look sleek but may be slippery—use caution.
Wedding planner note: If you’re set on a lighter runner (for budget or style), consider anchoring it along the edges with discreet tape (indoors) or hidden stakes (outdoors). Always confirm with the venue what adhesives are allowed.
Step 4: Get the Right Length and Width
Aisle runners that are too short look accidental, and ones that are too long can bunch at the altar.
Typical aisle runner sizing:
- Width: 24"–36" is most common. Wider looks more luxe, but only if it fits between chairs.
- Length: Measure from the ceremony entrance to where you want the runner to stop (usually a few feet before the altar/arch).
Quick measuring checklist:
- Ask your venue for the ceremony aisle length, or measure during a walkthrough.
- Decide if the runner stops:
- Right at the altar (more dramatic, but higher risk of bunching)
- 2–4 feet before the altar (cleaner and safer)
- Confirm the chair layout so your runner doesn’t get swallowed by wide spacing—or crammed by tight seating.
Real-world scenario: A couple planning a ceremony in a hotel ballroom measured the aisle before the final seating chart was set. When chairs moved closer together, their 36" runner looked cramped and curled at the edges. Solution: finalize layout first, then order runner width.
Step 5: Decide on Color, Personalization, and Details
Most couples choose white or ivory because it photographs cleanly and complements wedding attire. But it’s not the only option.
- White/Ivory: Timeless and bright in photos, but shows dirt easily outdoors.
- Champagne/Neutral: Softer look, hides minor marks better.
- Black: Striking for modern weddings, but can show dust and footprints depending on fabric.
- Patterned/Printed: Best used carefully—patterns can compete with a detailed dress or busy decor.
Personalization ideas (that still look elegant):
- Monogram or shared last name near the aisle entrance
- Wedding date in small type along the bottom corner
- A meaningful phrase (keep it short—long quotes can look cluttered)
Pro tip: If you’re personalizing, keep the design to the first 2–3 feet of the runner near the entrance. That’s where guests see it and where photographers often capture detail shots—without creating text that gets covered by feet.
Budget: What Aisle Runners Cost (and Where to Save)
Aisle runners can range from a simple, affordable option to a custom statement piece.
- Budget-friendly (approx. $20–$60): Paper or non-woven fabric runner (best indoors)
- Mid-range (approx. $60–$150): Polyester fabric runner, thicker non-woven, some personalization
- Higher-end (approx. $150–$400+): Heavy canvas, custom printing/monograms, premium finishing
Smart ways to save:
- Choose a non-personalized runner and invest in aisle florals or petals instead.
- Use a runner only for the main aisle section (not all the way to the entrance) if your layout allows.
- Repurpose: a canvas runner can sometimes become a keepsake (signed by guests at a post-wedding brunch, for example).
Timeline: When to Buy, Test, and Set Up Your Aisle Runner
Timing prevents last-minute stress—and avoids the classic “it’s creased and we don’t have time” problem.
- 8–12 weeks before: Decide if you’re doing a runner, confirm ceremony layout and surface, pick material.
- 6–8 weeks before: Order your runner (earlier if custom/personalized).
- 2–3 weeks before: Do a quick test at home:
- Walk on it with similar shoes
- Check if it slips on a similar surface
- See how it looks in phone photos
- Wedding week: Steam (if fabric), re-roll tightly, pack your securing supplies.
- Day-of setup: Assign someone (planner/coordinator or a reliable friend) to place and secure it 30–90 minutes before guests arrive.
Pro tip: If you’re getting married outdoors, plan a “wind check” and have a backup (stakes, sandbags disguised with greenery, or the option to skip the runner if conditions are rough).
How to Keep an Aisle Runner Flat, Safe, and Photo-Ready
Most aisle runner regrets come from movement: sliding, wrinkling, or lifting. Prevent it with a simple plan.
Securing methods (choose what fits your venue rules)
- Double-sided carpet tape: Great for carpet, sometimes works on smooth floors (test first).
- Painter’s tape + runner tape: Gentler option for venues concerned about residue (always test).
- Aisle runner stakes (outdoors): Best for grass; place every few feet along edges.
- Weighted corners: Hide small weights under floral clusters or greenery at corners.
Make it look intentional
- Start the runner with a small “welcome moment”: florals, lanterns, or signage at the entrance.
- Keep petals to the sides if you want a clean walking path—especially important for heels.
- Ask your photographer about their ceremony angles; the runner should look great from the back and from the side.
Real-World Aisle Runner Scenarios (and What Works Best)
Scenario 1: Church ceremony with an existing aisle carpet
If the church already has a traditional aisle carpet, you may not need a runner. If you want a brighter look for photos, choose a fabric runner in white/ivory and secure it carefully. Confirm with the church coordinator—some don’t allow tape or additional decor on the aisle.
Scenario 2: Outdoor garden ceremony on grass
Choose canvas, plan for stakes, and keep decor low so it doesn’t blow over. Skip scattered loose petals if the wind is unpredictable; consider petal cones for guests to toss after the ceremony instead.
Scenario 3: Beach ceremony
Many couples opt out of a runner and instead line the aisle with florals, shells, lanterns, or chairs angled inward to create a defined path. If you do use a runner, go heavier and accept that sand will shift beneath it.
Scenario 4: Modern venue with concrete floors
Go with a thicker fabric runner or canvas to reduce slipping. Keep it minimal—concrete already has texture and style. Add a floral accent at the entrance and at the ceremony focal point for balance.
Common Mistakes to Avoid (and How to Fix Them)
- Mistake: Choosing a lightweight runner outdoors.
Fix: Upgrade to canvas or anchor aggressively with stakes/weights. - Mistake: Forgetting to check venue rules about tape, petals, or open flames.
Fix: Confirm policies in writing and share them with whoever sets up. - Mistake: Ordering the runner before finalizing your aisle layout.
Fix: Lock the ceremony floor plan first, then order length/width. - Mistake: Not testing footwear on the runner (especially stilettos).
Fix: Do a quick walk test; consider heel protectors or a thicker runner. - Mistake: Going heavy on personalization and cluttering the look.
Fix: Keep personalization minimal and placed near the entrance.
Wedding Planner Pro Tips for a Smooth Ceremony Walk
- Assign an “aisle captain.” One person is responsible for placing, smoothing, and securing the runner before guests arrive.
- Build in a 10-minute buffer. Even a perfect runner needs time to relax and lay flat.
- Carry an emergency kit item list:
- Runner tape / painter’s tape
- Small scissors
- Safety pins or clips (for fabric edges)
- Extra stakes (outdoors)
- Lint roller (especially for dark runners)
- Think about the recessional. The aisle runner should still look good when you walk back up together—often when guests are cheering and photos are lively.
FAQ: Ceremony Aisle Runners
Do I need an aisle runner for my wedding ceremony?
No. Aisle runners are optional. They’re most helpful when you want a defined aisle, a cleaner photo backdrop, or extra protection for attire on outdoor/rough surfaces.
What’s the best aisle runner for an outdoor wedding?
Canvas is usually the most reliable for outdoor ceremonies because it’s heavier and less likely to lift in wind. Secure it with stakes and consider weighted corners for extra stability.
How long should my aisle runner be?
Measure your aisle from the entrance to where you want the runner to stop. Many couples end the runner 2–4 feet before the altar/arch to prevent bunching and keep it looking neat.
How do I keep my aisle runner from slipping?
Use the right securing method for your surface: carpet tape for carpet, approved tape for smooth floors (test first), or stakes/weights for outdoor setups. Always confirm what your venue allows.
Are personalized aisle runners worth it?
They can be, especially if you love detail shots and want a keepsake. For the cleanest look, keep personalization minimal and place it near the aisle entrance where it won’t be covered by footsteps.
Can I use rugs instead of an aisle runner?
Yes—layered rugs can look stunning for boho or eclectic weddings. The key is safety: use non-slip pads or secure edges so nothing shifts during the processional.
Your Next Steps: A Simple Aisle Runner Checklist
- Confirm your ceremony surface (carpet, wood, grass, sand, stone).
- Measure your aisle after the seating layout is finalized.
- Pick material based on location and weather risk.
- Choose a color/style that complements your ceremony decor and photography vibe.
- Plan how you’ll secure it and confirm venue rules.
- Order on time (6–8 weeks ahead; earlier for custom).
- Test-walk it with your ceremony shoes.
- Assign setup responsibility to a coordinator, planner, or trusted friend.
Your aisle should feel like you—comfortable, intentional, and ready for that once-in-a-lifetime walk. With the right runner (or the confidence to skip it), you’ll have a ceremony space that looks beautiful and feels smooth from the first step to the final kiss.
For more warm, practical wedding planning help—from ceremony details to reception logistics—browse the latest guides on weddingsift.com.
More Articles
 How to Negotiate With Wedding Vendors Like a Pro
 Wedding Planning Timeline for 12-Month Engagement
 Wedding Planning Communication Tips for Couples
 How to Plan a Wedding With a Photo Scavenger Hunt
 How to Plan a Wedding With a Live Streaming Option
 Wedding Guest List Etiquette Who to Invite and Who Not To
 How to Plan a Wedding With a Ceremony Aisle Decor
 Wedding Planning How to Choose Ceremony Participants
 Wedding Day Vendor Meal Breaks Scheduling Guide
 How to Plan a Wedding With a Live Acoustic Musician