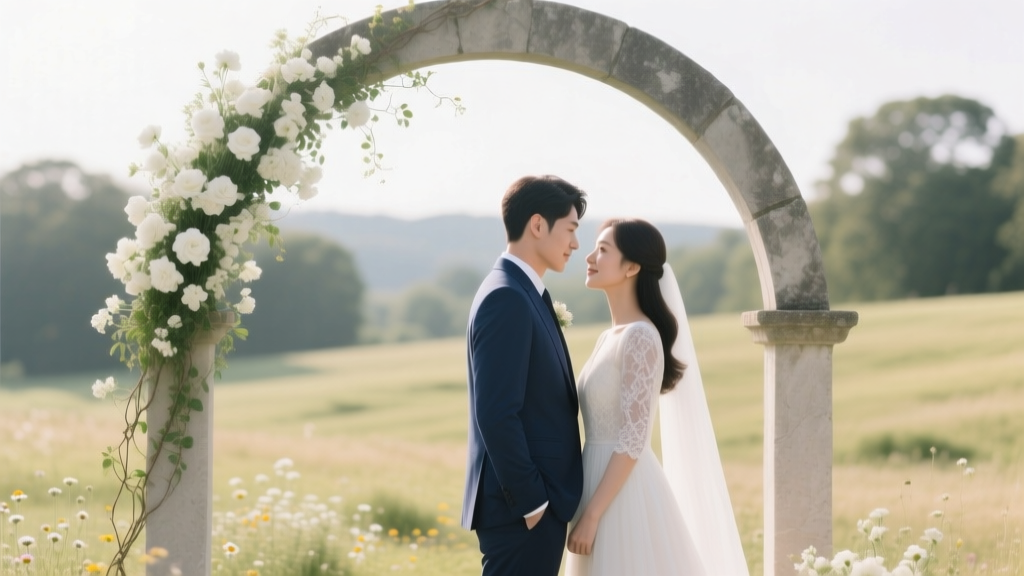
Wedding Planning How to Choose the Perfect First Look Spot
The first look is one of those wedding moments couples talk about long after the cake is gone and the dress is packed away. It’s intimate, emotional, and beautifully “just you two”—even if your photographer and videographer are quietly nearby. Choosing the perfect first look spot can make that moment feel effortless… or feel rushed, crowded, and stressful.
If you’re juggling a dozen decisions (venue details, timelines, family expectations, weather plans), it can be hard to know how to pick a location that’s meaningful and practical. The good news: you don’t need a “Pinterest-perfect” backdrop to have a powerful first look. You need a spot that fits your day, your personalities, and your wedding photography goals.
This guide walks you through how to choose a first look location with confidence—plus timeline tips, budget considerations, examples from real wedding scenarios, and common mistakes wedding planners see all the time.
What Makes a First Look Spot “Perfect”?
The best first look spot is the one that supports three things at once: emotion, logistics, and great photos. Here’s what that looks like in real life.
1) Privacy (or at least “privacy enough”)
- Avoid high-traffic areas where guests might accidentally wander through.
- Choose a spot where you can take a breath without feeling watched.
- If your venue is busy, privacy can mean a tucked-away corner, a quiet hallway, or a reserved courtyard.
2) Beautiful, flattering light
- Open shade (like under a large tree, overhang, or next to a building) often photographs better than harsh midday sun.
- Golden hour is dreamy, but it isn’t always practical for timeline flow—your photographer can still create magic earlier with the right spot.
- Indoor first looks can be stunning near large windows or in bright, neutral rooms.
3) A backdrop that matches your wedding style
- Garden wedding? Flowers, greenery, and soft architecture feel cohesive.
- Modern city wedding? Clean lines, architectural walls, rooftop views, or artful interiors.
- Rustic barn celebration? Wood textures, fields, or a quiet path near the property.
4) Convenient access (especially for outfits and mobility)
- Think about stairs, gravel paths, long walks, and narrow doorways.
- Factor in the dress train, veil length, heels, or mobility needs for either partner.
- A “pretty” spot isn’t worth it if you arrive sweaty, stressed, or late.
Step-by-Step: How to Choose Your First Look Location
If you’re feeling overwhelmed, use this simple process. Couples who follow these steps usually end up with a spot that feels intentional—and a calmer wedding day timeline.
Step 1: Decide what you want the moment to feel like
Before scouting locations, talk about the vibe.
- Quiet and private: Just the two of you, with your photo team at a distance.
- Grand and cinematic: A dramatic staircase, doorway, balcony, or wide outdoor view.
- Playful and casual: A coffee shop patio, arcade corner, or relaxed venue lounge.
- Sentimental: A spot tied to your story (where you got engaged, shared a first date, or take weekend walks).
Step 2: Check your timeline and pick a realistic window
First looks typically happen 1.5–3 hours before the ceremony, depending on travel, portraits, and wedding party photos. Work backward from your ceremony start time.
Quick timeline example (ceremony at 5:00 PM):
- 2:00 PM: Final hair/makeup touches, getting dressed
- 3:00 PM: First look + couple portraits
- 4:00 PM: Wedding party photos / immediate family photos
- 4:30 PM: Hide away, freshen up, pre-ceremony buffer
- 5:00 PM: Ceremony
Planner tip: Build in at least 15–20 minutes of buffer time. Dresses take longer to bustle, people run late, and weather can shift.
Step 3: Scout 2–3 options (not just one)
Even if you love your top choice, you’ll want backups. Aim for:
- Plan A: Your dream spot
- Plan B: Same area, different angle (in case the sun is too bright or there are unexpected people)
- Plan C: A solid indoor option for rain/wind/heat
If you can, do a quick walkthrough at the same time of day as your first look will happen. Light changes everything.
Step 4: Ask your photographer for input (and show them your shortlist)
Your photographer thinks in terms of light direction, background clutter, and where they can stand without being seen. Send photos of each location or do a venue walkthrough together.
Checklist to ask your photographer:
- Where will the best light be at that time?
- Is the background clean or busy (trash cans, signs, parked cars)?
- Is there enough space for a long lens (for more privacy-feeling photos)?
- Where can we stand so the reveal feels natural?
Step 5: Confirm logistics with your venue (permissions, access, timing)
- Some venues restrict photography in certain areas or require supervision.
- Ask if any areas are used for guest arrival or vendor load-in during your first look time.
- Confirm if you can reserve a space (especially in hotels, public gardens, museums, or historic homes).
Best Types of First Look Spots (with Real-World Scenarios)
1) A tucked-away garden or courtyard
Why it works: Greenery looks timeless, and courtyards often provide shade and privacy.
Scenario: You’re getting married at a winery with a central lawn where guests will mingle. Instead of the main lawn, you choose a side courtyard behind the tasting room. Your planner places a small “Reserved” sign, and your photographer uses the stone wall and vines as a natural frame.
2) A quiet indoor space with window light
Why it works: Reliable lighting, weather-proof, and easier for outfits/hair.
Scenario: It’s a summer wedding and the heat index is high. You pick a bright hotel suite with large windows and neutral walls. You get a calm, tearful first look without worrying about sweat, wind, or bugs.
3) A scenic overlook, rooftop, or balcony
Why it works: Big “wow” factor and expansive background.
Scenario: Downtown wedding with a rooftop cocktail hour later. Your venue lets you use the rooftop earlier for 10 minutes. Your photographer schedules it right before guests arrive, and your video captures the skyline behind your hug.
4) A long hallway, grand staircase, or doorway reveal
Why it works: Built-in drama and symmetry; great for classic wedding photography.
Scenario: You’re marrying in a historic mansion. One partner stands at the base of the staircase facing away; the other walks down slowly. It feels cinematic, but still private because the mansion is closed to guests until later.
5) A meaningful off-site location (with careful planning)
Why it works: Personal, unique, and deeply “you.”
Scenario: You want your first look at the park where you got engaged. Your ceremony is at 4:30 PM, so you build travel time into the schedule and arrange a shuttle for you both. Your planner confirms a permit isn’t needed, and your photographer suggests an open-shade spot near the trees.
Budget Considerations: What Could Affect Cost?
A first look doesn’t have to increase your budget, but certain choices can add expenses. Here’s what to watch for:
- Permits or location fees: Public gardens, museums, and some parks may require photo permits.
- Transportation: Going off-site might mean an extra vehicle, shuttle, or rideshare coordination.
- Extra photography coverage: If off-site travel pushes the day earlier, you may need additional hours.
- Weather backups: Renting a tent, umbrellas, or reserving an indoor room can add cost.
Money-saving tip: Choose a first look spot within a 2–5 minute walk of where you’re getting ready. You’ll save time, reduce transportation complexity, and protect your photography timeline.
Timeline Advice: When Should You Schedule the First Look?
Most couples schedule the first look before the ceremony so they can:
- Enjoy a private moment together
- Take couple portraits while hair/makeup is freshest
- Knock out wedding party and family photos early
- Join cocktail hour (or at least part of it)
Planner guideline: Reserve 15 minutes for the first look itself and 30–60 minutes for couple portraits immediately after (depending on your photo priorities and locations).
If you’re skipping the first look: You can still create a private “first touch” moment around a corner, exchange letters, or pray together without seeing each other. The spot selection principles still apply—privacy, light, and calm access.
Common Mistakes to Avoid (and How to Fix Them)
Mistake 1: Choosing a spot that’s too public
What happens: Guests or strangers wander into the moment, and you feel self-conscious.
Fix: Ask your planner/venue coordinator to block the area for 10–15 minutes, or pick a secondary tucked-away location.
Mistake 2: Ignoring harsh sunlight or mixed lighting
What happens: Squinting, patchy shadows, or orange indoor lighting that clashes with daylight.
Fix: Choose open shade outdoors, or an indoor space with consistent window light. Let your photographer guide the exact positioning.
Mistake 3: Underestimating travel time and outfit logistics
What happens: Wrinkled outfits, dirty hems, late arrivals, flustered energy.
Fix: Keep it close, or add buffer time and a “dress handler” (friend, attendant, or planner) to help manage the train and veil.
Mistake 4: Picking a cluttered backdrop
What happens: Exit signs, stacked chairs, trash cans, parked cars steal attention.
Fix: Turn slightly, change angles, or use greenery/walls to simplify the frame. Your photographer can do a quick “background sweep” before you step in.
Wedding Planner Pro Tips for a Smooth First Look
- Do a sound check: If you’re near a road, kitchen, or construction area, it can pull you out of the moment (and affect video audio).
- Keep the pathway clear: Make sure vendor carts, floral deliveries, and catering setups aren’t rolling through your first look route.
- Plan the “reveal” mechanics: Decide if you’ll tap on the shoulder, walk up from behind, meet around a corner, or open doors toward each other.
- Hold phones and personal items elsewhere: Put keys, wallets, and room cards with your planner or in the getting-ready suite so pockets stay clean in photos.
- Bring a small touch-up kit nearby: Blotting papers, tissues, lip color, and a lint roller go a long way.
First Look Spot Checklist (Save This for Your Planning Notes)
- Is it private enough for us to feel present?
- Is the light flattering at the time we’re scheduled?
- Is there a clean, uncluttered background?
- Is it close to where we’re getting ready and/or the ceremony?
- Is the ground dress-friendly (not muddy, uneven, or full of debris)?
- Do we have a rain/wind/heat backup?
- Does the venue allow photos there at that time?
- Do we need a permit or reservation?
- Have we shared the plan with our photographer and planner/coordinator?
FAQ: Choosing the Perfect First Look Spot
Do we have to do a first look?
No. It’s completely optional. Many couples love it for the calm and the timeline benefits, while others prefer seeing each other at the ceremony. You can also do a “first touch” or exchange letters for a private moment without seeing each other.
How long should we budget for the first look?
Plan for 15 minutes for the first look moment itself. If you’re doing couple portraits immediately after, add 30–60 minutes depending on how many locations and photo styles you want.
What’s the best time of day for first look photos?
Golden hour is gorgeous, but it’s not the only option. Late afternoon open shade or indoor window light can be just as flattering. The best time is the one that fits your wedding day timeline without rushing you.
What if it rains or it’s extremely windy?
Choose a Plan C indoor location you actually like (not just “wherever there’s space”). Covered patios, breezeways, bright lobbies, and suites with large windows are great backups. If wind is common at your venue, avoid exposed overlooks and opt for sheltered courtyards.
Can we do the first look at a different location from the venue?
Yes—just be realistic about transportation, permits, and added photography time. If you go off-site, build in buffer time and have a clear plan for where you’ll freshen up afterward before the ceremony.
Will a first look ruin the emotion of the ceremony?
Almost never. Couples often say the ceremony feels even more meaningful because they’re calmer and more present. You’ll still get that “here we are” feeling when you see each other walking down the aisle—just in a different way.
Your Next Steps
To choose your first look spot with confidence, do three things this week:
- Pick your ideal vibe (private, cinematic, playful, sentimental).
- Shortlist 2–3 locations with a rain backup.
- Share the shortlist with your photographer and confirm timing with your venue or planner.
The right first look spot doesn’t just look good—it helps you slow down and really feel the day. You deserve that kind of calm, on-purpose moment.
Want more wedding planning support? Browse more helpful planning guides and timelines on weddingsift.com.
More Articles
 Wedding Planning Timeline for 12-Month Engagement
 How to Plan a Wedding With Multiple Events Over a Weekend
 Wedding Planning Vendor Meal Planning Guide
 Wedding Planning Final Walkthrough Checklist
 Wedding Planning How to Choose Ceremony Music
 How to Plan a Wedding That Feels Uniquely Yours
How to Handle Wedding Vendor Meals
How to Plan a Wedding That Feels Uniquely Yours
How to Handle Wedding Vendor Meals
 Wedding Planning How to Create a Stress-Free Morning
 How to Plan a Wedding That Stays Within Your Values
 Wedding Vendor Payment Schedule Best Practices